this transfers data (which is stored in "bin" file in mbed storage) into LPC1114, LPC1115, LPC81x, LPC82x, LPC1768/LPC1769 and LPC11U68/LPC11E68 internal flash memory through ISP.
Dependencies: mbed MODSERIAL DirectoryList
You are viewing an older revision! See the latest version
Homepage
Information
日本語版がこのページ下半分にあります.
Japanese version is available lower half of this page.
Caution!
このプログラムでイカを焼くことはできません (^ ^;
"Ika-shouyu-poppoyaki" is a name of local dish in Japanese.
If I try to do a direct translation, it will be something like "Choo-choo grilled calamari with soy-sauce".
However, you may noticed already, it cannot be grilled by this program ;-)
ISP programming application on mbed
ISP program writes data into flash memory of target MCU.
This mbed program programs target MCU flash memory through UART. It uses "In-System Programming (ISP)" interface in target MCU (NXP LPC micro-controllers).
The ISP is done by PC with serial cable normally. The ISP protocol is executed software on a PC. The software reads a data file and transfers the data with the ISP protocol.
This program does same process of that. The mbed perform function like "FlashMagic" or "lpc21isp".
(This program does not just copy the binary but also insert 4 byte checksum at address 0x1C.)
This program currently supports LPC1114, LPC81x, LPC82x and LPC1768/LPC1769.
Information
For the LPC1768 and LPC1769, this program supports writing only. It cannot perform verifying.
Modification for targeting LPC82x series has been done by Mr. k4zuki. Thank you very much!

How to execute
With this program, all you need to do is..
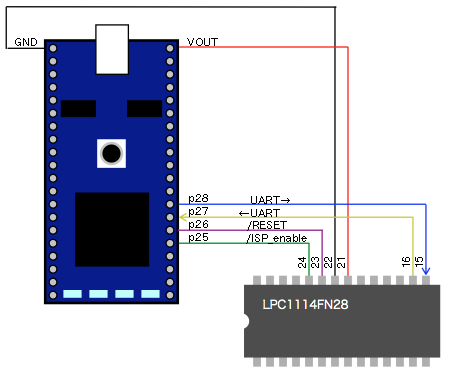
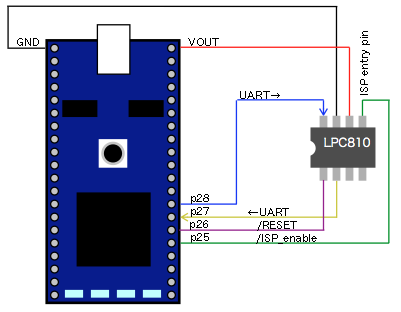
- Connect the mbed and the target (/RESET and /ISP_enable signals in are option. Those are not necessary if you set the target ISP mode manually)
- Rename your (binary) file to "bin" and copy into the mbed storage.
- Press reset button of mbed.
- When the program completed successfully, you will find the LEDs on mbed blinks sequentially (LED1→LED2→LED3→LED4).
- If it failed, the mbed reports it "Runtime error" by LEDs.
- You can also monitor the progress and result on a terminal screen (mbed reports those by printf).
- if you enabled "AUTO_PROGRAM_START", the program in the target will be started automatically.
- from version 0.7, this program works as "USB-serial bridge" after the ISP writing done. The serial enabled target program (and if "AUTO_PROGRAM_START" is enabled, ) the UART will come up on the terminal screen after ISP completion. Please set "TARGET_OPERATION_BAUD_RATE" as baud rate of target program. The ISP speed can be set by "ISP_BAUD_RATE" separately.

Sample of operation
Next picture is sample of the operation.
- The target (LPC1114) goes into ISP mode after first reset.
- mbed writes binary into flash in the target (binary size is 12668 bytes in this sample).
- when the writing completed, mbed starts reading the flash. the data is verified by comparing with original file.
- Asserting reset again with "ISP_enable pin" HIGH.
- The target starts to work with written binary (program). In this sample, the target sending character data on UART and toggling LED (GPIO) pin periodically.

Reference
- DIP28 package ARM : LPC1114 code development by mbed → Getting started with mbed LPC1114
- Idea of this program is based on Chris' notebook page: "Prototype to hardware". This page introduces the ISP flash programming using an mbed as USB-UART interface.
- "Chapter 26: LPC111x/LPC11Cxx Flash programming firmware" in LPC111x/LPC11Cxx User manual UM10398
- "Chapter 22: LPC800 Flash ISP and IAP programming" in LPC800 User manual UM10601
イカ醤油ポッポ焼き
mbed用ISPプログラム
NXP製のマイコンは,内部フラッシュメモリへのプログラムの書き込みをUART経由で行うことができます.
通常,この作業はPC上のソフトウェア(たとえば"FlashMagic"や"lpc21isp"など)を用いて,PC上のファイルのデータをUARTで接続したフラッシュに書き込みます.
「イカ醤油ポッポ焼き」はmbedでそれらのソフトの代わりをさせるものです.mbedストレージ内に置いた「bin」と名付けられたファイルを読み,フラッシュへ書き込みます.
この書き込みを行う際には,アドレス0x1Cに置いておく必要のある4バイトのチェックサムも自動で追加されます.
現在サポートしているターゲットはLPC1114,LPC81x,LPC82x,LPC1768(LPC1769)です.
Information
LPC1768 and LPC1769 では書き込みのみがサポートされます.読み出し検証は実行されません.
LPC82xシリーズをターゲットとするための変更をMr. k4zukiさんがしてくださいました.ありがとうございます!

美味しい料理法
このプログラムの動かし方は次の通り
- mbedとターゲットを接続する (ターゲットを手動でISPモードに入れる場合には,/RESET と /ISP_enable は接続する必要はありません)
- 書き込みたいファイル(バイナリフォーマット)の名前を「bin」に変更して,mbed内にコピー
- mbedのリセットボタンを押す
- 書き込みが無事に終了するとmbed上のLEDが順番に点滅を繰り返します(LED1→LED2→LED3→LED4).
- もし何らかのエラーが発生して失敗した場合には"Runtime error"が発生した時のLED点灯となります.
- またコンピュータのターミナルで状況や結果を確認することもできます(mbedがprintfで状況を出力しています)
- "AUTO_PROGRAM_START"を有効にしてあれば,書き込み終了後,ターゲットのプログラムは自動的にスタートします.
- バージョン0.7以降,このプログラムはISP書き込みの終了後にUSB-Serialブリッジとして動作するようにしてあります.ターゲットのプログラムがシリアルを使うもので(かつ"AUTO_PROGRAM_START"が有効で)あれば,入出力はそのままISP完了後のターミナルに現れます."TARGET_OPERATION_BAUD_RATE"はターゲットのプログラムが使うボーレートに合わせてください.ISPの書き込みに使うボーレートは "これとは別に"ISP_BAUD_RATE"で指定することができます.

動作の例
次の図は動作の例です
- 最初のリセットによってターゲット(LPC1114)がISPモードに入ります
- mbedがターゲットのフラッシュにバイナリを書き込みます(この例では12668バイトのバイナリを書いています)
- 書き込みが終わるとフラッシュの読み出しを始めます.このデータを元のファイルとの比較し,検証を行います
- ISPイネーブル・ピンをHIGHにして再度リセットを行います
- ターゲットは書き込まれたプログラムの実行を開始します.この例ではターゲットは周期的にUARTへ文字データを送り,LEDを(GPIOピン)を点滅させます
- The target starts to work with written binary (program). The target sending character data on UART and toggling LED (GPIO) pin periodically.

イカ醤油ポッポ焼き味付けレシピ
Information
この節はざますざんすさんが作成してくれました.
ありがとうございます!
これは,イカ醤油ポッポ焼きに新しいターゲットデバイスを追加する場合のレシピを纏めたものです.
必要事項:target_table.cpp へ新しいDevice ID register を追加する.
target_table.cppに記載されているターゲット一覧.
target_param    target_table[]  = {
    { "unknown ttarget",        0xFFFFFFFF, 1024,    4096, 4096, UUENCODE, 0x10000200 },
    { "LPC1114FN28(FDH28)/102", 0x0A40902B, 4096,   32768, 4096, UUENCODE, 0x10000200 },
    { "LPC1114FN28(FDH28)/102", 0x1A40902B, 4096,   32768, 4096, UUENCODE, 0x10000200 },
    { "LPC810M021FN8",          0x00008100, 1024,    4096, 1024, BINARY,   0x10000300 },
    { "LPC811M001JDH16",        0x00008110, 2048,    8192, 1024, BINARY,   0x10000300 },
    { "LPC812M101JDH16",        0x00008120, 4096,   16384, 1024, BINARY,   0x10000300 },
    { "LPC812M101JD20",         0x00008121, 4096,   16384, 1024, BINARY,   0x10000300 },
    { "LPC812M101JDH20",        0x00008122, 4096,   16384, 1024, BINARY,   0x10000300 },
///added for LPC82x series
    { "LPC824M201JHI33",        0x00008241, 8192,   32768, 1024, BINARY,   0x10000300 },
    { "LPC822M101JHI33",        0x00008221, 4096,   16384, 1024, BINARY,   0x10000300 },
    { "LPC824M201JDH20",        0x00008242, 8192,   32768, 1024, BINARY,   0x10000300 },
    { "LPC822M101JDH20",        0x00008222, 4096,   16384, 1024, BINARY,   0x10000300 },

};
上記コードは以下の構造を取っている.target_table.h に以下のコードがある.
typedef struct  taget_param_st {
    char            *type_name;
    int             id;
    int             ram_size;
    int             flash_size;
    int             sector_size;
    int             write_type;
    unsigned int    ram_start_address;
}
以下の順番にtarget_table.cppにコーディングする.
{type_name, id, ram_size, flash_size, sector_size, write_type, ram_start_address}
作業の手順例
データはユーザマニュアル(UM)と Data sheet から検索する.以下に例を上げる.
LPC82xxの場合
UM10800 LPC82x User manual http://www.nxp.com/documents/user_manual/UM10800.pdf
LPC82x Product data sheet http://www.nxp.com/documents/data_sheet/LPC82X.pdf
- type_name:
- UMから Part identification numbers を検索すると,Table 322. Part identification numbersが現れる.Table 322より Table記載のDeviceを入力.
- id:
- UMから Part identification numbers を検索,Table 322. よりHex codingを入力.
- UMから Part identification numbers を検索,Table 322. よりHex codingを入力.
- ram_size:
- Product data sheet よりOrdering options を検索しTable2より上記Deviceと同じターゲットのRAMサイズを記載(byte)
- Product data sheet よりOrdering options を検索しTable2より上記Deviceと同じターゲットのRAMサイズを記載(byte)
- flash_size:
- Product data sheet よりOrdering options を検索しTable2より上記Deviceと同じターゲットのFlashサイズを記載(byte)
尚,1KBは1024byteにて計算
- Product data sheet よりOrdering options を検索しTable2より上記Deviceと同じターゲットのFlashサイズを記載(byte)
- sector_size:
- UMから Flash configuration を検索し25.5 General description に「The size of a sector is 1 KB and the size of a page is 64 Byte. One sector contains 16 pages.」と記載があるので,ターゲットのSectorサイズを記載(byte単位).今回の場合は1KBなので1024byte.
- write_type:
- 通常はBINARYを指定.ただし,http://www.nxp.com/documents/application_note/AN11229.pdf に記載のあるチップはUUENCODEで.UMをWrite to RAM や Write to RAM <start address> <number of bytes> で検索すると書き込みタイプが出てきます.例えばLPC17xx等はhttp://www.nxp.com/documents/user_manual/UM10360.pdf で確認するとUUENCODEとなる.
- ram_start_address:
- UMからUART ISP Write to RAM command もしくは Write to RAM を検索.Example に書いてあるアドレスを記載する.
- UMからUART ISP Write to RAM command もしくは Write to RAM を検索.Example に書いてあるアドレスを記載する.
参考
- DIP28パッケージのARM:LPC1114のコードをmbedで → [lang:ja] mbed LPC1114での遊び方
- このプログラムのアイデアはクリスさんのノートブック・ページ: "Prototype to hardware"に端を発しています.このページにはmbedをUSB-UART変換器として使ったISPでのデータ書き込みが紹介されています
- LPC111x/LPC11Cxx ユーザマニュアル UM10398,"第26章: LPC111x/LPC11Cxx Flash programming firmware"
- LPC800 ユーザマニュアル UM10601,"第22章: LPC800 Flash ISP and IAP programming"
日本語版だけの(何の役にも立たない)参考情報
Information
何故このプログラムが作られたか.そして何故こんな名前なのか.
こちらを御覧ください →→ イカ醤油ポッポ焼きはイカにして生まれたか(´(ェ)`;
このプログラムを作ってみるきっかけになったツイート.
- 8月のある日の昼ごはんを食べたあとにボーっとしてた時の思いつき.
https://twitter.com/tedd_okano/status/370758009749647361 - このファイル名拡張子「.bin」の問題は結局放置
https://twitter.com/tedd_okano/status/370758364109631489 - そしてこういうことに
https://twitter.com/tedd_okano/status/370764502142169088 - 結論(笑
https://twitter.com/tedd_okano/status/370765594628337664
(´(ェ)`)