Automatic PIll Box Dispenser
 Brandon Sheu.
2
replies
Brandon Sheu.
2
replies
Smart Medicine Dispenser with Alexa
Team Members
- Sahithi Bonala
- Stephen Brotman
- Christie Choi
- Brandon Sheu
Purpose
This project utilizes the Mbed, the Amazon Dot, a stepper motor, and a touch sensor to create a smart pill dispenser. The end goal is to have a pill box that auto-dispenses one’s daily medication, reminds the user to take their medication if they have forgotten to, and allows Alexa to assist the user with voice commands.
Description
This pill dispenser will have seven compartments, one for each day of the week, arranged into a circular carousel shape. The user will only be able to access one compartment at a time in each 24-hour time frame. There is a stepper motor that will spin the tray to reveal each compartment every 24-hours (or another specified time). When new pills are ready to be taken for the day, the RGB LED will light up green. A touch sensor detects if the user has taken their medication for the day. If the user has not, the RGB LED will flash red to remind the user they are behind schedule. If the user has, the RGB LED will turn off until the next scheduled pill deliver, e.g. 24 hours later. A push button is integrated to allow users to turn the carousel, reveal compartments, and refill the empty compartments at the beginning of the week. The user can ask Alexa if they have taken their pills or not, and Alexa will reply.
Below is a block diagram of our project.

Components
- Mbed LPC1768
- Amazon Echo Dot
- Touch Sensor (Phidgets 1110 0A)
- Stepper Motor (28BYJ-48)
- Motor Driver (ULN2003)
- RGB LED
- SPST Push Button
- Custom 3D Printed Pill Container
CAD Design
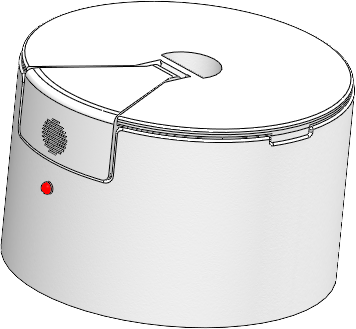
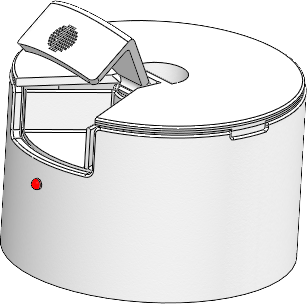
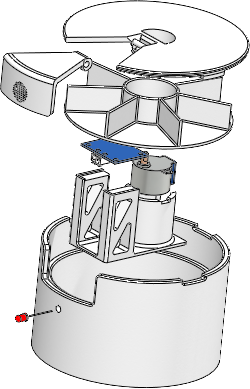
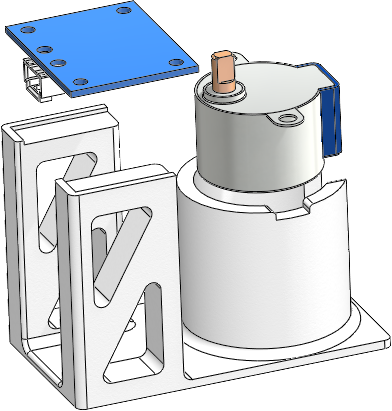
Figures showing the outside of the pill box (upper-left), the pill box with its lid raised (upper-right), the exploded view of the pill box (bottom-left), and the touch sensor, motor, and motor housing (bottom-right).
Connections
Information
A 5V external power source is required to power the touch sensor and the motor.
| Touch sensor | Mbed |
|---|---|
| power | 5V (external source) |
| output | p12 |
| ground | GND |
| Motor driver | Mbed |
|---|---|
| power | 5V (external source) |
| IN1 | p8 |
| IN2 | p9 |
| IN3 | p10 |
| IN4 | p11 |
| ground | GND |
| Motor |
|---|
| 5 pin connector to motor driver |
| RGB LED | Mbed |
|---|---|
| red | p21 |
| green | p22 |
| blue | p23 |
| ground | GND |
Creation of Amazon Alexa Skill Procedures
Step 1: Sign into Amazon Web Services (AWS) and create a mySQL database
- Log in to the AWS Management Console. If you haven’t done so already, you’ll need to create a free account.
Step 2: Create a lambda function
The instructions below are very closely related to the instructions in Step 1 of the Alexa Python Tutorial . We recommend you reference the Alexa Python Tutorial for helpful screenshots while following the steps below.
- Log in to the AWS Management Console.
- From the list of services, select Lambda.
- Click the region drop-down in the upper-right corner of the console and select US East (N. Virginia), which is a supported region for Lambda functions used with the Alexa Skills Kit.
- Choose Create a Lambda Function or Get Started Now to choose a blueprint for your new function.
- In the search filter box, type alexa.
- Select blueprint alexa-skills-kit-color-expert-python. Make sure to choose the blueprint that ends in -python.
- Make sure the trigger is set to Alexa Skills Kit, then choose Next.
- Name your function myPillSkill.
- Make sure pop-ups are enabled. Then, under Lambda function handler and role, select Create a custom role.
- When the IAM role management console opens, choose Allow to go back to the previous Lambda console.
- The role is now populated with lambda_ basic_execution. Choose Next then choose Create function.
- Scroll down to the section labeled Function Code (Use the image below for guidance on steps 13-15)
- Under the Code entry type dropdown select the Upload a .Zip file option and attach the zip file you downloaded.
- Make sure the Runtime box says Python 2.7
- Change the Handler box to read app.lambda_handler
- Click the Save button and then the Test button at the top of the page.
- Scroll up to the top of the page,if you see a result like the one shown below you can move on. Otherwise, read through the errors and fix them.
- Copy the Amazon Resource Name (ARN) displayed in the upper-right corner of the console that starts with arn:aws:lambda....
Step 3: Use the Amazon developer portal to configure your skill The instructions below are very closely related to the instructions in Step 2 of the Alexa Python Tutorial. We recommend you reference the Alexa Python Tutorial for helpful screenshots while following the steps below.
- Sign in to the Amazon developer portal. If you haven’t done so already, you’ll need to create a free account.
- From the top navigation bar, select Alexa.
- Under Alexa Skills Kit, choose Get Started >
- Choose Add a New Skill.
- Name your skill. This is the name displayed to users in the Alexa app. For this example, we’ll call it Phil - Pill Assistant.
- Create an invocation name. This is the word or phrase that users will speak to activate the skill. For this walkthrough, we’ll use Phil (case-sensitive). Users will say, "Alexa, open Phil" to interact with your skill. Choose Save to continue to development for our skill .
- Choose Next to continue to development for our skill.
- In the Intent Schema box, paste the following JSON code.
JSON Code
{
  "intents": [
    {
      "intent": "HaveITakenMyPillsIntent"
    },
    {
      "intent": "AMAZON.HelpIntent"
    }
  ]
}
9. Under Sample Utterances, enter all the phrases that you think users might say to interact with your skill. The more phrases you enter, the better the results. For our example, paste the following:
Phrases
HaveITakenMyPillsIntent did I take my pills today
HaveITakenMyPillsIntent should I take my pills
HaveITakenMyPillsIntent can you check if I have taken my pills
HaveITakenMyPillsIntent Phil can you check if I have taken my pills
HaveITakenMyPillsIntent Phil did I take my pills today
HaveITakenMyPillsIntent Phil should I take my pills
10. Choose Next and wait until the interaction model finishes loading, in no more than a few seconds.
11. Select the Endpoint AWS Lambda ARN then paste your ARN code. Select North America as your region, and for Account Linking select No, then choose Next.
12. Select Next and your skill should be ready for use on your device.
Code
Libraries
Import librarysMotor
Library for 4 Phase Step Motor like 28BYJ-48
Last commit 14 Jun 2012 by  Nuno Sarmento
Import librarymbed-rtos
Official mbed Real Time Operating System based on the RTX implementation of the CMSIS-RTOS API open standard.
Last commit 04 Jul 2017 by  mbed official
Mbed Program
Import program4180AutomaticPillBoxDispenser
Code for automatic pill box dispenser
Last commit 13 Dec 2017 by Christie Choi
Alexa Skills
Python Program
Alexa Python Server
alexa.py
from time import sleep
import serial
import pymysql
import datetime

ENDPOINT = ""
USER = ""
PASS = ""
DB_NAME = ""

#try:
conn = pymysql.connect (host = ENDPOINT,
                            user = USER,
                            passwd = PASS,
                            db = DB_NAME,
                            port = 3306
                           )
print(conn)
print('Starting...')

ser = serial.Serial('/dev/tty.usbmodem1422', 9600)  # Establish the connection on a specific port
line = []
flag = 0
while True:
    for c in ser.readline():
        if chr(c) == '\n':
            break
        line.append(chr(c))
    print(line)
    line = ''.join(line)
    print(line)
    if(line == "cmdPill"):
        print("Received cmdPill!\n")
        with conn.cursor() as cur:
            a = datetime.datetime.now()
            a = str(a)
            statement = "INSERT INTO PillStatus (timestamp) VALUES('" + a + "');"
            cur.execute(statement)
            conn.commit()
    elif(line == "cmdTime"):
        print("Received cmdTime!\n")
        with conn.cursor() as cur:
            statement = "UPDATE PillFrequency SET start='{}' WHERE id=0;".format(str(datetime.datetime.now()))
            cur.execute(statement)
            a = datetime.datetime.now()
            a = a + datetime.timedelta(0,15)
            a = str(a)
            statement = "UPDATE PillFrequency SET end='" + a + "' WHERE id = 0;"
            cur.execute(statement)
            conn.commit()
    line = []
    sleep(.1)  # Delay for one tenth of a second

ser.close()
Photos

Design Animation
Video Demonstration
2 comments on Automatic PIll Box Dispenser:
Please log in to post comments.
hi . i have a project with the same perpes as y, please can you send me the designe prorotype 3D ??? please. my email : a_kanouni@enst.dz