Introduction to mbed
This page is an introduction to mbed for partners who have not yet tried mbed.
Setup
Creating an mbed account
You need to create an mbed account if you don't have one.
This step is necessary only for the first time.
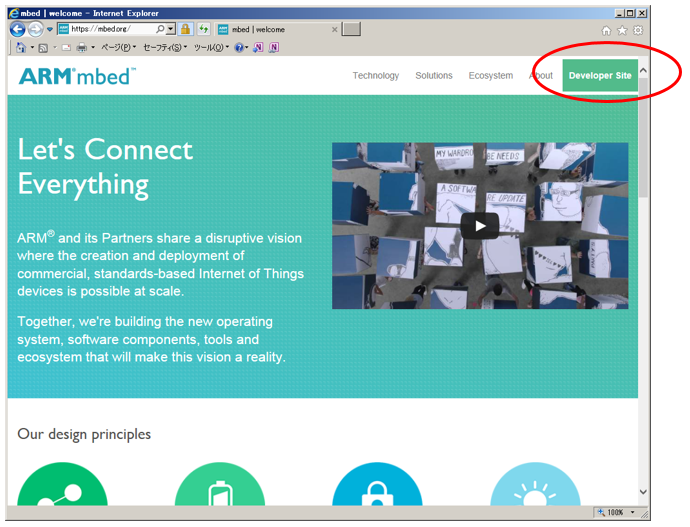
- Move from https://mbed.org/ to Developer Site".
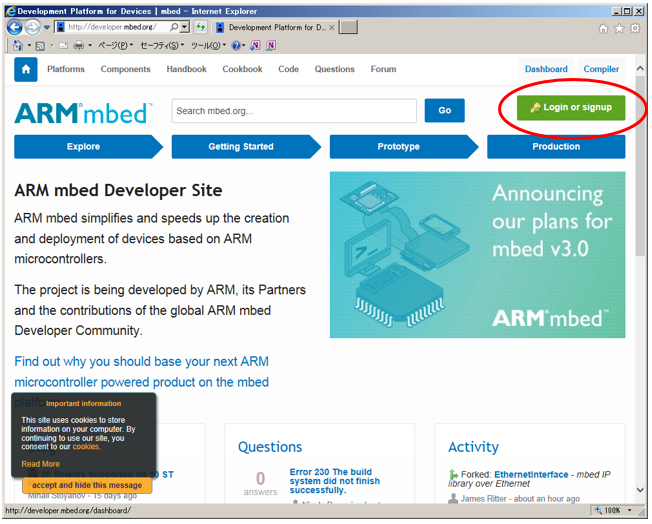
- Click "Login or signup".
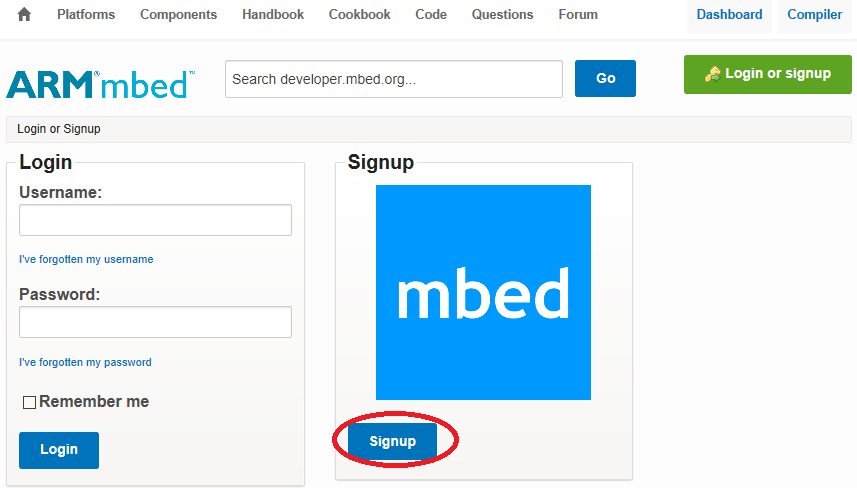
- Click "Signup".
- Click "No, I haven’t created an account before".
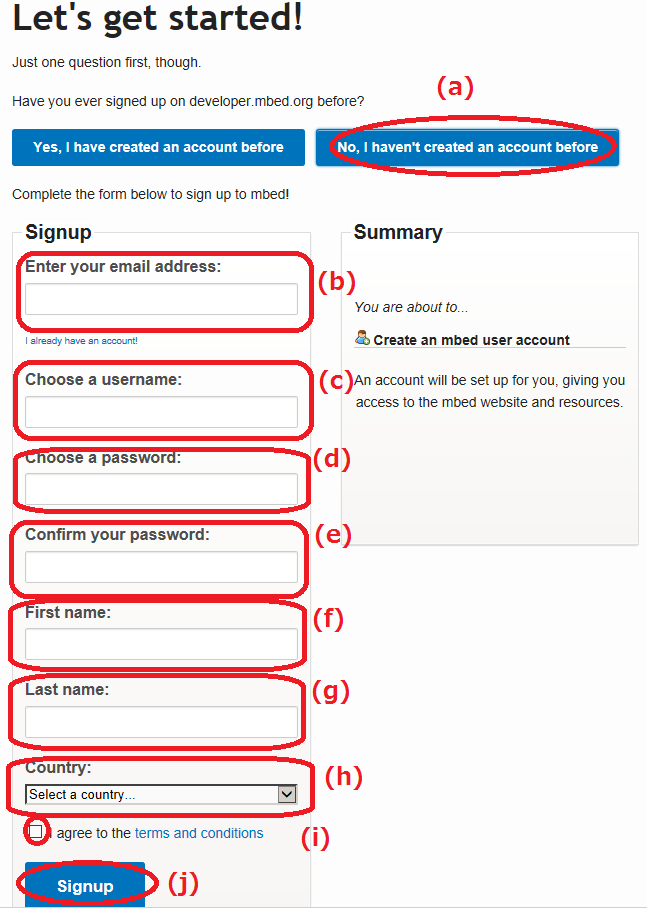
- Enter your user name and password, check the "agree" check box, then click "Signup".
Logging into mbed
You may already be logged in by your browser depending on the cookie setting.
- Move to Developer Site from https://mbed.org/.

- Click "Login or signup."

- Fill the following fields and click "Login".
- user name (mail address)
- password

- user name (mail address)
Configuring the GR-PEACH's debug I/O for communication with your PC.
- Connect GR-PEACH and your PC.
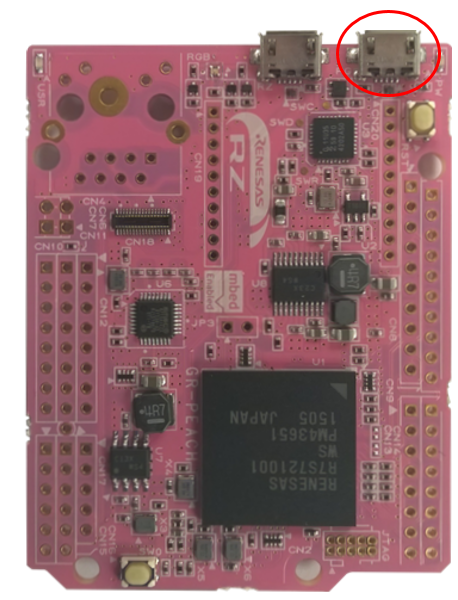
- When GR-PEACH is recognized by the PC, it looks like a USB drive named "MBED".
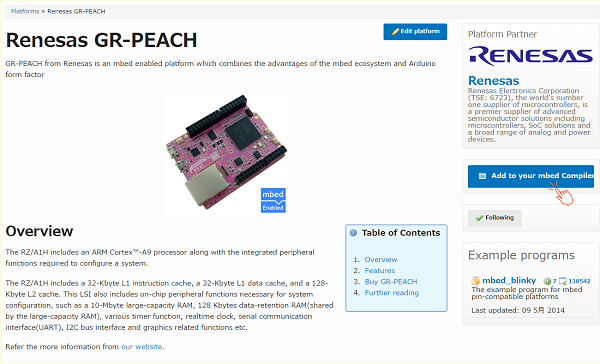
- You will find "mbed.htm" in the root folder of the MBED drive. Open it with your browser.
- Click "Add to your compiler" on the right side.
Use GR-PEACH debug I/O
Under Windows, you can use the GR-PEACH's debug I/O through a terminal by installing a serial driver.
- Install the serial driver when GR-PEACH appears as the "MBED" drive.
"Download latest driver" at the destination link is the target driver.
About the mbed Online Compiler
You can open the mbed online compiler window by pressing the "Compiler" button at the upper right corner of the page when you are logged in at the site.

programs and libraries
Program and library are defined in mbed as follows:
| A collection of code that can make up an executable program including main.cpp. | |
| A code that can be cut off as a unit function in the folder for the program. Its contents may be a collection of code or stored in a library format (*.ar). |
Importing a "program"
You may import a program either by importing it from the Compiler window or by expanding the program at the mbed site.
Importing within the mbed Compiler
Take the following actions in the mbed Compiler window:
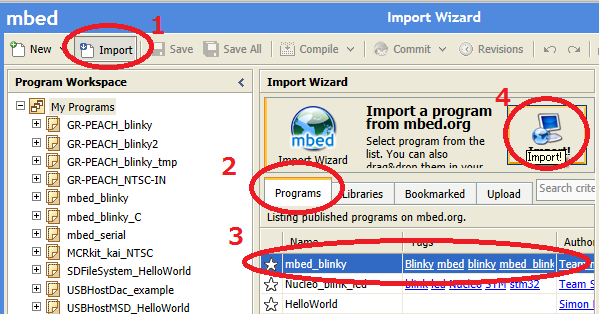
- Press the Import button.
- Select the "`Programs" tag.
- Search program you need.
If you click "search" button when input box is empty, all programs will apair. - Select the program you want to import.
- Press the "import!" button
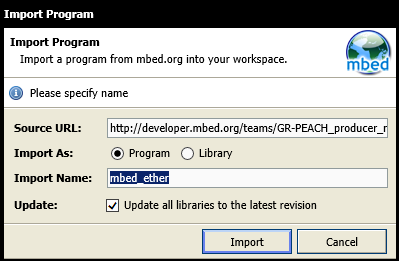
- Do not check "Update all libraries to the latest version" if you want to import the program in the environment in which the writer of the program published it. To use the latest version of the libraries, check "Update all libraries to the latest version."
Importing a program at the mbed site
- Move to the page for the target program at the mbed site.
- Click "import this program" located on the right side of the window.

- Do not check "Update all libraries to the latest version" if you want to import the program in the environment in which the writer of the program published it.
To use the latest version of libraries, check "Update all libraries to the latest version."

Creating a new program
- Choose "New Program" from "New" at the upper left corner of the mbed Compiler window.
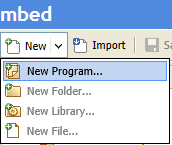
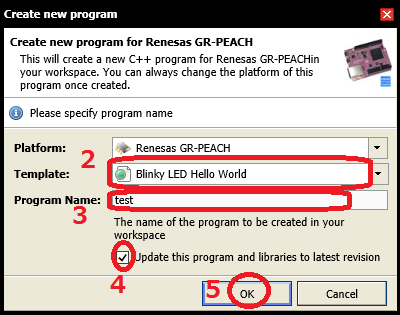
- Select either "Blinky LED Hello World" or "Empty Program".
- Enter the name of the program. You cannot specify a program name that is already registered with the compiler.
- If you specified "Blinky LED Hello World," you will be asked whether to update the program and libraries to be downloaded. Normally, you should check it.
- After completing the above steps, press "OK."
Importing libraries
Importing within the mbed Compiler
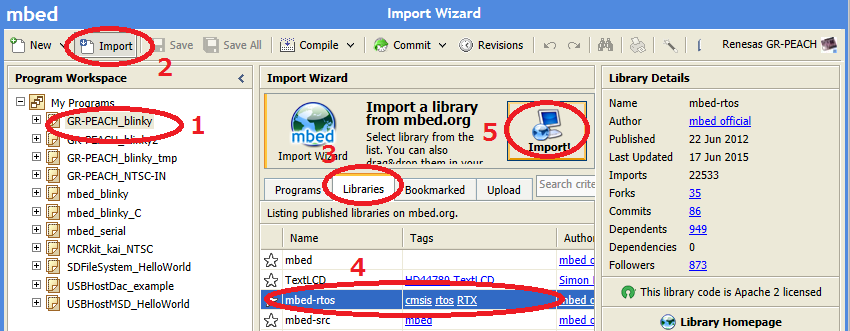
- select directory in your program workspace to import library.
- Select the location into which the libraries are to be imported.
- Press the "Import" button.
- Select the "Libraries" tag.
- Search library you need.
If you click "search" button when input box is empty, all libraries will apair. - Select the libraries you want to import (two or more libraries may be selected).
- Press the "import!" button.
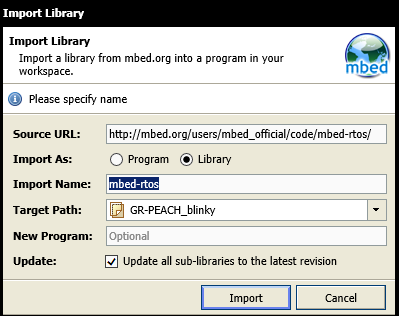
- Check "Update all libraries to the latest version" if you want to use the latest version of libraries
.
Importing a library at the mbed site
- Move to the page for the target program at the mbed site.
- Click "Import this library" on the right side of the window.

- Check "Update all libraries to the latest version" if you want to use the latest version of library.

Creating a new library
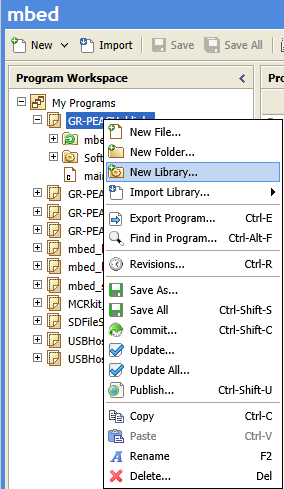
- Right-click on the location in which you want to create a library and choose "New Library."
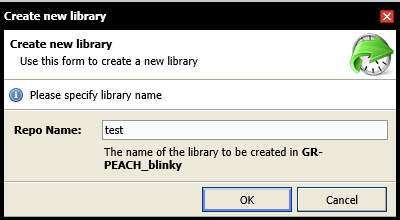
- Enter the name of the library and click "OK."
Importing Local files
If you are using a browser other than IE
Drag&drop the files into the Compiler window.
If you drag&drop a zip-compressed file, the contents of the zip file will be added.
If you are using IE
If you add code which is zip-compressed in a file, the contents of the zip file will be added.
- Click "Import" in the mbed compiler.
- Click the "Upload" tag.
- Click "Browse" and select the files you want to upload.

- Select the files you want to import in the mbed compiler.
- Click the "Import!" button.

Publishing program or libraries
Publishing a program
When you publish a program, you are also publishing its libraries.
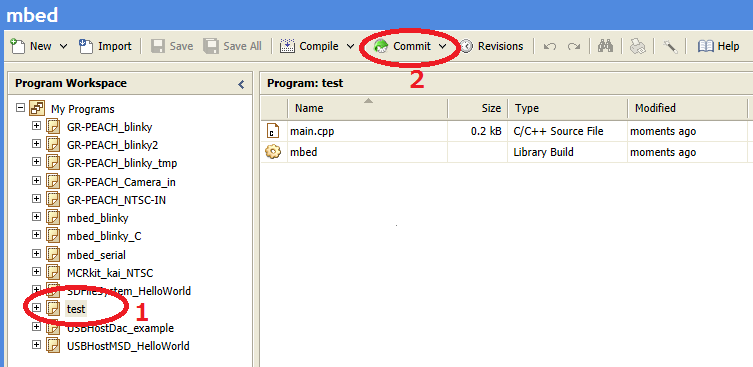
- Select the program you want to publish in the mbed online compiler.
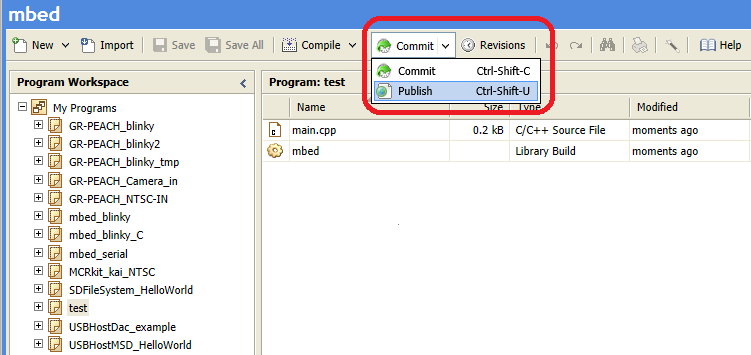
- Press the Commit button.
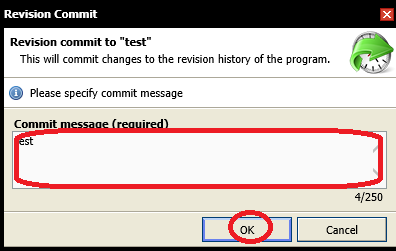
- The Revision Commit window will appear. Enter the commit message and press OK.
- Click "v" in ther right of "commit" buton and select "Publish".
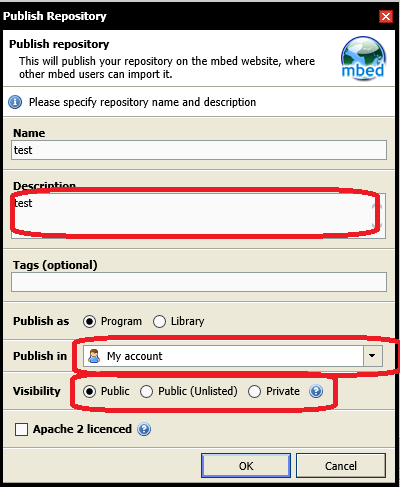
- Enter the message in the Publish Repository window.
- Select the destination of publication in "Publish in."
- My account: Publishes on the code page of your account.
- [Team name]: Publishes on the code page of the team you belongs to
- Select the publication level in "Visibility."
- Public: Anyone can import.
- Public (Unlisted): Anyone can import.
The code page is invisible to other users, however. Only users who know the URL can import. - Private: No one else can import.
- Press "OK" when the scope of disclosure is established.
- After your program is published, dialog box below will be apaired:
- Open Page: Open the page of porgram you published.
- Close: Continues your compiler.

- Open Page: Open the page of porgram you published.
Publishing your library
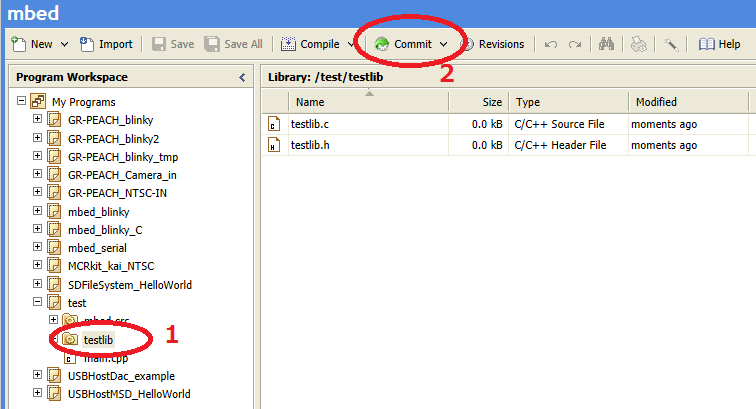
- Select the library you want to publish in the mbed online compiler.
- Press the Commit button.
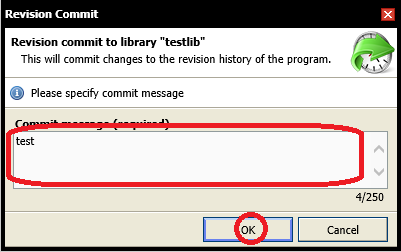
- The "Revision Commit" window will appear. Enter the commit message and press OK.
- Press "v" on the right side of the Commit button and choose "Publish."

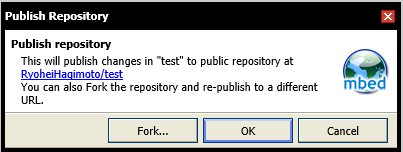
- The following window will open when you publish an imported library:
- Fork: If you do not want to update the library in the source of import
- OK: If you want to update the library in the source of import
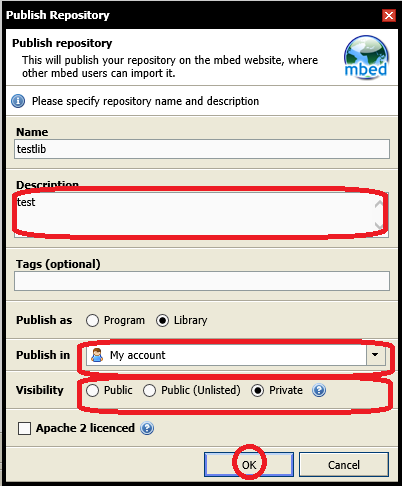
- Enter the message in the Publish Repository window.
- Select the destination of publication in "Publish in."
- My account: Publishes on the code page of your account.
- [Team name]: Publishes on the code page of the team you belongs to
- Select the publication level in "Visibility."
- Public: Anyone can import.
- Public (Unlisted): Anyone can import.
The code page is invisible to other users, however. Only users who know the URL can import. - Private: No one else can import.
- Press "OK" when the scope of disclosure is established.
- The window will look like as shown below if the publication is successful.
- Open Page: Opens the page you published.
- Close: Continues Compiler window processing.

Deleting a Published Program or Library
- Go to the page carrying the program or library you published.
- Click the "Admin settings" tab.

- Scroll the window down to the bottom.
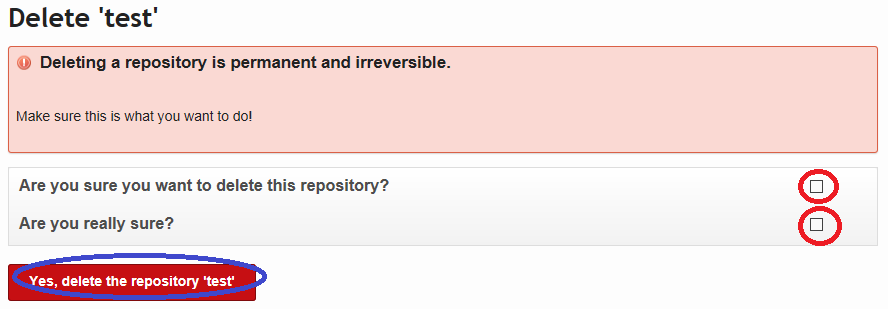
- Check "Are you sure you want to delete this repository?"
- Check "Are you really sure?"
- Click "Yes delete the repository *."
Please log in to post comments.
