EasyVR Voice Recognition
The EasyVR module by Veear and available from several other distributers is a small low-cost voice recognition module.
Hello World
Import programEasyVR_Bridge
Serial Bridge program to support using the EasyVR with mbed. It is run when using the PC-based EasyVR GUI tools for voice recognition training and testing.
Last commit 08 May 2011 by  jim hamblen
Library
Import programEasyVR_Bridge
Serial Bridge program to support using the EasyVR with mbed. It is run when using the PC-based EasyVR GUI tools for voice recognition training and testing.
Last commit 08 May 2011 by jim hamblen
Notes
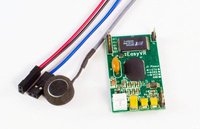
The EasyVR module by Veear and available from several other distributers is a small low-cost voice recognition module. Pricing is about the same as mbed. A basic speech recognition demo was working after about an hour of work after opening the box. The black potted IC in the middle is likely the processor chip and the large chip is flash. Most likely, it is one of the ICs from Sensory that was used in the recent reincarnation of Furby and quite a few other embedded devices and toys.

The EasyVR module, microphone, and cable set
Wiring
It outputs a serial TTL signal and runs off of 3.3V. Just plug in the microphone, hook up power, and then the serial RX/TX pins. Don't forget the RX and TX swap when connecting to mbed (i.e., RX-TX and TX-RX) and be very careful not to swap the color coded power pins!

Wire connections from EasyVR to mbed
| mbed | EasyVR | wire color |
|---|---|---|
| gnd | gnd | black |
| Vout(3.3) | Vcc | red |
| RX(14) | ETX | white |
| TX(13) | ERX | blue |
Training using the EasyVR GUI
The serial bridge code below can then be run on mbed so that it can talk to their PC-based EasyVR GUI training program over mbed's USB Virtual Com Port. This software allows the user to create and test new speaker dependent (i.e., trained for one person) command words.
Bridge_for_EasyVR_GUI_tool
//EasyVR Bridge Program to connect to PC using mbed
#include "mbed.h"

Serial pc(USBTX, USBRX); // tx, rx
Serial device(p13, p14);  // tx, rx

int main() {
    while(1) {
        if(pc.readable()) {
            device.putc(pc.getc());
        }
        if(device.readable()) {
            pc.putc(device.getc());
        }
    }
}
Import programEasyVR_Bridge
Serial Bridge program to support using the EasyVR with mbed. It is run when using the PC-based EasyVR GUI tools for voice recognition training and testing.
Last commit 08 May 2011 by jim hamblen

The PC-based EasyVR GUI using the mbed bridge code for training
Standalone Voice Recognition
It comes with some built-in speaker independent voice recognition commands (available in English, Italian, Japanese, German, Spanish and French). Here is a demo based on the number commands. This video is using the set of number words (0..10) to control (toggle) the 4 leds on mbed. The demo needs some more work to add timeout and error code checking as suggested in their manual, but it works fairly well without it. Commands and responses are all sent as printable ASCII characters.
mbed using EasyVR to toggle LEDs
Speaker_Independent_VR_Demo
#include "mbed.h"

DigitalOut led1(LED1);
DigitalOut led2(LED2);
DigitalOut led3(LED3);
DigitalOut led4(LED4);
Serial device(p13, p14);  // tx, rx

int main() {
    char rchar=0;
//wake up device - needs more work and a timeout
    device.putc('b');
    while (device.getc()!='o') {
        device.putc('b');
        led1 = 1;
        wait(0.2);
    }
    led2=1;
    while (1) {
        device.putc('i'); //Start Recognition
        device.putc('D'); //Use Wordset 3 - the numbers 1..10
//Use built-in speaker independent numbers (0..10) and listen for a number
        while (device.readable()!=0) {}
        if (device.getc()=='s') {
            device.putc(' ');
            rchar=device.getc();
            if (rchar=='B') led1=!led1;
            if (rchar=='C') led2=!led2;
            if (rchar=='D') led3=!led3;
            if (rchar=='E') led4=!led4;
        }
    }
}
Speech Synthesis and Audio output
For speech synthesis, the EasyVR can play compressed audio files of human speech. The EasyVR can also output to a 8ohm speaker (J2 jack in upper right corner of board) for feedback and speech synthesis, but that feature was not used in the first demo. Users can make their own custom sound tables from *.wav files using Sensory's Quick Synthesis 5 tool included with the EasyVR software. I had issues running it on Win 7 64-bit and it could not seem to compress and save the sound files, but it worked OK on a different PC with a 32-bit OS. According to a recent EasyVR forum post a new version should be available soon that should fix this issue. There is also a fix for 64-bit Windows posted in the forum that helps with some of the sound table build issues. Audio files must be in *.wav format at 22050 Hz with 1 channel and 16-bits. Audacity, a free open source digital audio edit tool, can be used to convert most audio files to this format so that they can be used in the Quick Synthesis tool. The EasyVR GUI includes the commands to process and download the custom sound tables produced by Quick Synthesis to the EasyVR module. Whenever building a new sound table, build it, save it, and rebuild it. This is required to update all of the time stamps in the project so that the EasyVR GUI tool will allow downloading the new sound table.

The Quick Synthesis tool is used to generate compressed sound files
The tool to download new sound tables in the EasyVR GUI operates at 115200 baud, so to download a new sound table to the module's flash, a serial bridge program is needed setup for 115200 baud instead of the 9600 baud rate used earlier for speech recognition commands. A pull-up resistor must be attached to the /XM pin to force it >3V (100ohm for 3.3v supply or 680ohm for a 5V supply) and power must be cycled after the pull-up is in place. Here is the bridge code to download new sound tables:
Import programEasyVR_SoundTableBridge
EasyVR Bridge Program to connect to PC using mbed and download custom sound tables at 115200 baud
Last commit 22 May 2011 by jim hamblen
In the download dialog box, also check the "slow transfers" (115200 baud) box before hitting the final download button. After downloading the new sound table to flash, remove the jumper, cycle power, reload the 9600 baud bridge program, connect and click on the last sound table group in the left column. It should expand to show the new sounds just downloaded. You can select a new sound and click the speaker icon to play it on the speaker attached to the EasyVR module. I seemed to get a bit more volume on the speaker using a 5V supply for the EasyVR. This process is documented in the newest version of the EasyVR documentation from Veear. There is also a programming and firmware update cable that might make the process easier that should be introduced soon.
A similar setup can be used for firmware updates (pullup and 115200 baud). I had an early? EasyVR module with version “A” firmware and updated it to version “B” firmware based on instructions found at the EasyVR forum. Version “A” does not support sound output and it does not have the built-in beep sound table. Note: The older VRbot modules cannot be upgraded. The module type is printed on the PCB silkscreen.

Using the EasyVR GUI download tool to program new sound files to flash at 115200 baud

The new sound table should appear back in the EasyVR GUI at 9600 baud
Once the sound table is in flash on the EasyVR module, it can be played back on the speaker with a play command using the index into the sound table as shown in the GUI image above. A small delay is needed between characters in complex multicharacter commands to ensure that a character is not occasionally dropped in the EasyVR UART. This delay is provided by using wait(.001). The EasyVR responds with a "o" after the sound is played back. A C function for playback is shown below. Num is the index into the sound table.
function_to_play_sound
// Function to play a sound file on speaker
void speak(int num) {
    // Send Play Sound command
    device.putc('w');
    // small delay is needed between characters
    wait(.001);
    // Sound table index
    device.putc('A' + num/32);
    wait(.001);
    device.putc('A' + num%32);
    wait(.001);
    // max volume
    device.putc('P');
    // Wait for response of 'o' as playback ends
    while (device.getc()!='o') {}
    wait(.25);
}
Using Speech Synthesis with Speech Recognition
For the second demo which took a bit more work, several appropriate computer voice response *.wav files were obtained on the web. Using Audacity, the *.wav files were converted to the correct sample rate for use in the Quick Synthesis tool. In Quick Synthesis, the audio files were compressed to a low data rate. The default compression technique was used and there are also quite a few others to select from with different size and quality trade offs. Then using the EasyVR GUI tool download option, the new sound table with the compressed audio files was programmed into the EasyVR flash memory.
For a more advanced demo, code was written to use speech synthesis output for vocal user prompts, SI (speaker independent) recognition for the LEDs, and a new SD (speaker dependent) word, mbed, for use as a password. In the EasyVR GUI, the train option was used to add the new SD word, mbed.
Mbed EasyVR Speech Synthesis and Recognition Demo
This second demo shows the EasyVR doing both speech synthesis and speech recognition. Speech synthesis plays compressed *.wav files from its flash memory on an 8 ohm speaker. Speech recognition includes a new speaker dependent word, mbed, that is based on a training sample from the user, and the built-in speaker independent numbers (0...10) that will work with any speaker without training. In the video, after logging on with the password of “mbed”, it prompts for a command code number. The numbers 1…4 will toggle the four built-in LEDs on mbed. Note that when an invalid number is spoken (i.e., not 0...10) it prompts the user to “restate the command”. Each successful recognition is “acknowledged”.
Import programEasyVR_SRSSDemo
EasyVR Speech Recogniton and Speech Synthesis Demo
Last commit 29 May 2011 by jim hamblen
To run the demo, you will also need to download the new sound table project to flash, and add and then train the password (mbed) in Group 1 using the EasyVR GUI. A zip file of the sound table project is available here
Ideas for Further work
Keep in mind that noise, distance from the microphone, and variations in the way words are spoken will all impact the accuracy of any speech recognition system. There is even a variation in the way an individual speaker says the same word from day to day.
Users can develop speaker dependent (i.e., trained for one speaker based on samples) recognition words with the EasyVR GUI tool that comes with the EasyVR module. For users that want to develop their own custom speaker independent (i.e., works for any speaker) recognition words, additional software is needed from Sensory (Quick T2SI) that does not come with the module. The larger and more expensive VoiceGP DK-T2SI board comes with this additional software.
There are some open source text-to-speech synthesis tools such as Espeak that produce computer generated speech, and the speech output can be saved as *.wav files, but they require a fairly large amount of memory and some file space. They could be used to generate a computer sounding voice for the EasyVR module offline by saving the *.wav files, if you did not want to use human speech. Recorded human speech is typically easier to understand. There are also several open source speech recognition programs available for embedded devices such as PocketSphinx.
The password group in the EasyVR tool uses SV (speaker verification) and requires a more precise match. It must be trained under similar conditions (environment noise and distance from microphone). Speaker verification technology uses word-spotting techniques to dramatically enhance password biometric accuracy in noisy environments
Another interesting project would be to use the EasyVR for voice control of a robot such as the Roomba or iCreate. It has a built-in speaker independent vocabulary for robot movement, and this is the one of the primary target markets for the device.

The 2005 Furby with a Sensory VR IC
In case you missed them, this video of a 2005 Furby II shows the toy's built-in speech recognition and synthesis capabilites. The software from Sensory can also keep track of when the mouth should move (called lipsync in the tool).
Similar software is available from Sensory for ARM cores and can be licensed for use in commercial products.
Recent demo of Sensory Software on a phone with a GPS application
Toy dog, Talking Clock, and Bluetooth headset demo
You need to log in to post a discussion