Emulated mouse with IMU
Air Mouse Project
By Qinchen Gu and Shi Jia
Project Description
The idea of this project comes from a marketed product Gyration Air Mouse Mobile, which can control your PC or Mac away from flat desktop using in-air motion sensing technology.

Photo showing the fully assembled Air Mouse
Components
- mbed LPC1768
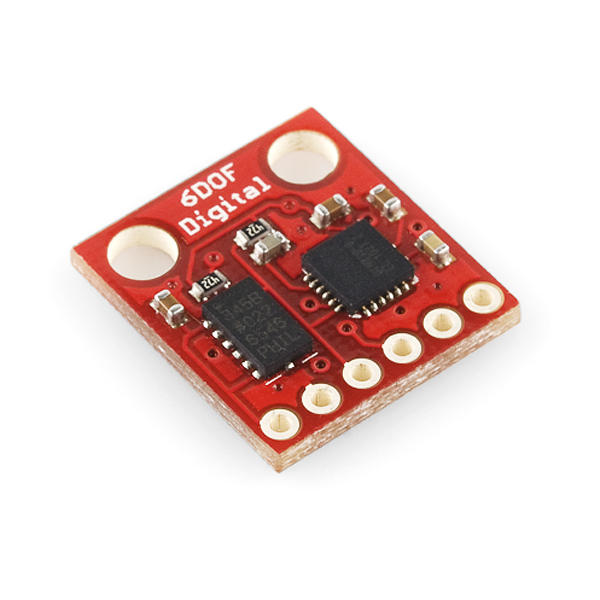
- Sparkfun IMU Digital Combo Board (6d0f)
- USB Type A Female Breakout
- Two pushbuttons
- breadboard & wires
Theories
To achieve such functionality, we use Sparkfun IMU Digital Combo Board (6d0f), which is a simple breakout for the ADXL345 accelerometer and the ITG-3200 MEMS gyro. The two sensors communicate with mbed over I2C.

IMU Digital Combo Board - 6 Degrees of Freedom ITG3200/ADXL345. Source: https://www.sparkfun.com/products/10121
Hardware Configuration
Table Listing the Connections
| mbed | USB Breakout | IMU Breakout | Left-click Pushbutton | Right-click Pushbutton |
|---|---|---|---|---|
| GND = P1 | GND | GND | Pin 2 | Pin 2 |
| P15 | Pin 1 | |||
| P16 | Pin 1 | |||
| SCL = P27 | SCL | |||
| SDA = P28 | SDA | |||
| D+ | D+ | |||
| D- | D- | |||
| VOUT | VCC |
Warning!
It is possible to connect the USB VCC pin to the power input of mbed (VIN) to avoid having to connect the mbed's USB port. However this feature has not been tested.
Schematics

Schematic of Circuits
Softwares
We include ADXL345_I2C and ITG3200 library to simplify sensor initialization. It is important to first calibrate the sensor on a horizontal plain, thus to calculate initial bias each time before operation.
#include
/**
 * IMU filter example.
 *
 * Calculate the roll, pitch and yaw angles.
 */
#include "IMUfilter.h"
#include "ADXL345_I2C.h"
#include "ITG3200.h"
#include "USBMouse.h"
The libraries needed to include in the main.cpp are:
- IMUfilter.h which calculates the roll, pitch and yaw from the data input;
- ADXL345_I2C.h which manages the communication with the ADXL345 accelerometer via I2C;
- ITG3200.h which manages the communication with the ITG3200 gyroscope via I2C;
- USBMouse.h which manages the USB HID interface communication with host.
main
int main() {

    //pc.printf("Starting IMU filter test...\n");

    //Initialize inertial sensors.
    initializeAccelerometer();
    calibrateAccelerometer();
    initializeGyroscope();
    calibrateGyroscope();


    leftClick.mode(PullUp);
    rightClick.mode(PullUp);
    //pc.printf("Initialized Successfully...\n\r");

    //Set up timers.
    //Accelerometer data rate is 1600Hz, so we'll sample at this speed.
    accelerometerTicker.attach(&sampleAccelerometer, GYRO_RATE);
    //Gyroscope data rate is 1600Hz, so we'll sample at this speed.
    gyroscopeTicker.attach(&sampleGyroscope, ACC_RATE);
    //Update the filter variables at the correct rate.
    filterTicker.attach(&filter, FILTER_RATE);


   //pc.printf("Timers Setup...Entering Loop...\n\r");


    while (1) {

        wait(0.01);
 //       pc.printf("angle_x = %f,  angle_ y = %f\n",-toDegrees(imuFilter.getRoll()),-toDegrees(imuFilter.getPitch()));
        processClick();
        processMove();
    }

}
- In the main function, the gyro and accelerometer sensor need to be initialized first, and we set pullup mode for the push buttons.
- By interrupt, the accelerometer and gyro get samples at 1.6kHz, and IMU filter processes the raw input data.
- In the while loop, the USB mouse functions including process click and move are called with frequency of 100Hz.
Import programP4_IMU
Air Mouse Project
Our goal is to compute Roll, Pitch and Yaw of the break board based on gyro and accelerometer, and use the computed result to control the moving direction of the mouse. However, the 6dof board involves accumulated error causing significant drift of the mouse after only a few seconds. As a result, we also include the inertial measurement unit (IMU) filter library which can in real time eliminate accumulated error.
Finally, USB device library also need to be included. We add two pushbuttons to simulate left click and right click of a real mouse. The built in function mouse.move, mouse.press, mouse.release and mouse.click are used directly from the library.
Video Demo
1 comment on Emulated mouse with IMU:
Please log in to post comments.

I am having issues implementing this code after removing the USB Mouse code/files
How did you connect your IMU to the breadboard & did you implement pull up resistors within your circuit?
How did you check you sensor readings within the terminal?