MAX32625NEXPAQ
MAX32625 nexpaq Development Module
End of Life Notice
Please note that this platform is no longer supported.
Overview
The MAX32625NEXPAQ as part of the nexpaq developers kit takes phone customization to a whole new level. This is the easiest way to add new features to your phone. This cost effective, easy to use developers kit finally provides the tools needed to enable modders around the world.
The nexpaq technology provides a gateway between the phone and external modules that allows developers to create custom interfaces on their phone for just about any peripheral they can imagine. The use of web standards on the phone, and the mbed tools for the embedded code make this a truly cross platform development environment, where all you need is a web browser and a text editor to get started.
The MAX32625NEXPAQ nexpaq Development Module provides the core circuits and libraries needed to link to the nexpaq gateway, as well as development features for debugging and connecting to external devices.
- MAX32625NEXPAQ Features
- MAX32625 ARM Cortex-M4 96MHz
- nexpaq Card-edge Connector
- SWD/DAPLink Header with UART
- [USB MSC] Drag-n-drop programming
- [USB CDC] USB Serial Port
- [USB HID] CMSIS-DAP
- RGB LED
- Expansion Headers
- I2C, UART, SPI, PWM, 1-Wire, ADC
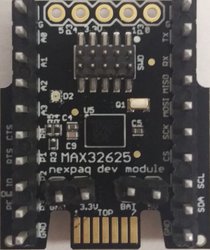
Pinout Diagram

The pinout diagram above shows the commonly used interfaces and their locations. Note that all the numbered pins (Px_x) can also be used as DigitalIn and DigitalOut interfaces.
Features
- Maxim MAX32625
- High performance ARM® Cortex™-M4 Core
- 96MHz, 160KB RAM, 512KB Flash
- USB 2.0 Full Speed Device
- SPI
- I2C
- UART
- 1-Wire
- PWM
- ADC
- RTC
- AES
- nexpaq System
- First modular smartphone case
- Cross platform (Android and iOS)
- Multiplatform Web Interface
- HTML 5
- CSS
- Javascript

Technical Reference
Power
Power is provided through the nexpaq card-edge connector from the gateway device (case, or development board). It is possible to power the microcontroller for programming by applying power to the 3.3V header pin, but this shuold never be done while the module is inserted into another board. The only recommended method for powering the module is through the card-edge connector.
Bootloader
There is a separate bootloader image that is used to identify the module and allows for the firmware to be updated by the app. If you need to restore this image, you can drag and drop this file onto the HDK DAPLink drive: /media/uploads/switches/max32625_npbl.hex
Additional Resources
- MAX32625NEXPAQ Product Page
- nexpaq Website
- nexpaq Developers Hub
- Brackets Text Editor
- Android File Transfer
- mbed Resources
- Serial Terminals: https://developer.mbed.org/handbook/Terminals
- Windows Driver: https://developer.mbed.org/handbook/Windows-serial-configuration
- Web Development Resources
- w3schools: http://www.w3schools.com/
- Mozilla Developer Network: https://developer.mozilla.org/
- CodePen (online code preview): https://codepen.io/
Getting Started with mbed
1. Connect your developer kit to a PC

Connect the boards as shown above. Make sure that power is provided to the developer board through one of the USB connectors, and that the HDK board is connected to a PC through the HDK connector. The status light on the HDK board will come on, indicating it has power. After a few seconds of activity, the PC will recognize the mbed Microcontroller as a standard USB drive.
 |  |
| Windows XP example | Mac OS X example |
2. Log into the mbed site
Go to developer.mbed.org/account/login.
If you do not have an mbed account, choose "Signup", and create your mbed Account. Otherwise, log in with your normal username and password.
This will give you access to the website, tools, libraries and documentation.
PC Configuration
Your mbed Microcontroller can appear on your computer as a serial port. On Mac and Linux, this will happen by default. For Windows, you need to install a driver:
Windows
See Windows-serial-configuration for full details about setting up Windows for serial communication with your mbed Microcontroller
From a host PC to communicate with mbed you will need a terminal application. This allows the mbed Microcontroller to print to your PC screen, and for you to send characters back to your mbed.
- Terminals - Using Terminal applications to communicate between the Host PC and the mbed Micrcontroller
Some terminal programs (e.g. TeraTerm) list the available serial ports by name. However, if you do need to know the identity of the serial port so that you can attach a terminal or an application to it:
| Windows | Mac | Linux | ||||
| Find the identity of the COM port by opening ''Device Manager''. To do this navigate ''Start -> Control Panel -> System -> Hardware -> Device Manager''. | To find the device name under Mac OS X, use the command ''ls /dev/tty.usbmodem*'' | To find the device name under Linux, use the command ''ls /dev/ttyACM*'' | ||||
 |  |  |
Example Programs
Import programIO_Demo
Default Demo Firmware for MAX32625NEXPAQ development module
Last commit 04 Feb 2017 by  nexpaq
Import programTemp_Prox_Demo
nexpaq development module demo for MAX3010x sensor
Last commit 16 Feb 2017 by nexpaq
Import programLED_Prox_Demo
LED Demo with proximity sensor support for nexpaq development system
Last commit 04 Feb 2017 by nexpaq
Import programALS_Prox_Demo
Proximity / Ambient Light Sensor LED Demo
Last commit 04 Feb 2017 by nexpaq
Where Next
Follow the guide to creating your own programs using the online compiler
You need to log in to post a discussion
Board Partner
Maxim Integrated
Maxim's microcontrollers provide low-power, efficient, and secure solutions for challenging embedded applications.