MAX32620HSP
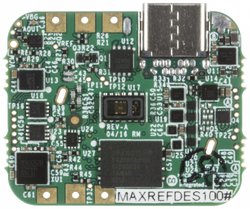
MAXREFDES100# Health Sensor Platform
End of Life Notice
Please note the last supported version is Mbed OS 5.8.
Overview
The MAXREFDES100# Health Sensor Platform is an integrated wearable sensor system designed to speed the development of new and innovative medical or high-end fitness applications. It combines biopotential, optical, thermal, and inertial sensors with the processing, communications, storage and power needed in a complete system. The entire platform is optimized for size and power to maximze battery life in the smallest, most unobtrusive footprint. This provides a highly functional foundation for developers, eliminating tedious prototyping stages so they can start adding value sooner and get to market quicker. It is also a great data collection tool for companies or institutions that need to gather raw data for analysis.
System Features
- MAX32620 ARM Cortex-M4F Microcontroller
- MAX30003 ECG / Biopotential AFE
- MAX30101 Pulse-Oximetry / Optical Heart-Rate Sensor
- MAX30205 Human Body Temperature Sensor
- MAX14720 Wearable Power Management IC (PMIC)
- Bluetooth Low Energy Radio
- 32MB of Flash Memory
- Detachable mbed HDK programmer/debugger
Typical Applications
- Algorithm Development
- Institutional Data Collection
- Real-Time data streaming over USB
- Un-tethered data logging to flash
- Fitness Product Development
- Heart Rate Chest Strap
- Optical Heart Rate on Wrist
- Optical Heart Rate on Ear
- Clinical Product Development
- Pulse Oximetry (Sp02)
- 1-Lead ECG / Arrhythmia Detection
Quick Start Guide
A Windows application with a graphical user interface is available to help familiarize users with features and how to configure the devices. Go to the MAXREFDES100# Health Sensor Platform product page details tab for instructions on how to install and run the PC application.
Remember to press the power button
Because this board is designed for battery powered operation, the default state is off and you must press the power button for a half second after applying power to turn it on. This applies to USB and battery operation. The button must be pressed after applying power by connecting to USB or inserting a battery. A 12 second press will turn the board off.
You will not be able to program or communicate with the board unless you turn it on by pressing the power button.
The information included below is intended for users who would like to develop their own applications on the Health Sensor Platform.
Peripheral Interfaces

The diagram above shows the port connections for all the major peripherals.
Features
- MAX32620 Ultra-Low Power Microcontroller
- High performance ARM® Cortex™-M4F Core
- 96MHz, 256KB SRAM, 2MB Flash
- Ultra-Low Power for Battery Applications
- 95µA/MHz Active Executing from Flash
- 600nA Low Power Mode with RTC Enabled
- 2.5µA Ultra-Low Power Data Retention Mode
- 5us Fast Wakeup to 96MHz
- Peripherals
- USB 2.0 Full-Speed Device
- SPI, I2C, UART, 1-Wire Serial Interfaces
- RTC, PWM, AES
- Four-Input 10-Bit ADC
- 49 GPIO
- Tiny 81-Ball 3.9mm X 3.9mm WLP
- MAX30003 Ultra-Low Power, ECG/Biopotential AFE
- Clinical-Grade ECG AFE
- 85uW Active Power
- 700nA Leads-On Detect Current
- Built-In R-R Heart Rate Detection
- High-Speed SPI Interface
- 32-Word FIFO
- MAX30101 Optical Pulse Oximeter / Heart-Rate Sensor
- Tiny 5.6mm X 3.3mm 14pin Optical Module
- Integrated Solution Includes
- Photodetectors
- Red, Green and IR LEDs
- Integrated Circuit
- Cover Glass
- Power Saving Features
- Programmable Sample Rate
- Programmable LED Drive Current
- Ultra-Low Shutdown Current (0.7µA)
- MAX30205 Clinical Grade Temperature Sensor
- +/-0.1C Clinical Grade Accuracy
- 2-Wire I2C Interface
- 2mm X 2mm 8-piin TDFN Package
- MAX14720 Wearable Power Management Solution
- Micro-Iq 250mW Buck-Boost Regulator
- Output programmable from 2.5V to 5V
- Micro-Iq 200mA Buck Regulator
- Micro-Iq 100mA LDO
- High-Side Power Load Switch
- Power-On/Off Control
- Push-Button Monitor
- Power Sequencing
- Extended Push Recovery Reset
- Power Supervisory
- Voltage Monitor Multiplexer
- Battery Impedance Detector
- I2C Control Interface
- Micro-Iq 250mW Buck-Boost Regulator
- MAXREFDES100HDK
- Provides mbed HDK functionality
- [USB MSC] Drag-n-drop programming
- [USB CDC] USB Serial Port
- [USB HID] CMSIS-DAP
- Detachable Interface
- Connects through USB Type-C Connector
- Allows access to USB while debugging
- Enables debugging while inside enclosure
- Uses standard USB Type-C cable when not debugging
- Provides mbed HDK functionality
Programming and Debug Adapter (MAXREFDES100HDK)

In order to provide all the standard mbed HDK features and maintain a tiny wearable size, the MAXREFDES100 comes with a detachable programming/debug adapter. The programming/debug adapter connects through a USB type-C connector that is shared with the normal USB signals so that the debug signals are accessible while inside an enclosure and to avoid adding a dedicated debugging connector. The connector is fully compatible with standard USB type-C cables when not debugging, and the pinout is symmetrical so the adapter will work in either orientation.
The MAXREFDES100HDK provides all the standard mbed HDK features:
- [USB MSC] Drag-n-drop programming
- [USB CDC] USB Serial Port
- [USB HID] CMSIS-DAP
Additionally, the MAXREFDES100HDK also provides:
- Pass through USB connection for access to USB while debugging
- 1.8V to 3.3V I/O Voltage
- 10 pin Cortex SWD Header for connecting to other targets
- HDK SWD Signals
- HDK UART Signals
Information
Check that you are using the latest MAXREFDES100HDK firmware for best results. Information on how to update the firmware can be found here: /teams/MaximIntegrated/wiki/MAXREFDES100HDK
Getting Started
1. Connect the HDK to the sensor board
Plug the HDK programming adapter into the health sensor board at the USB type-C connector.
2. Connect the HDK to a PC
Connect your PC to the HDK board at the micro-USB connector marked HDK. After a few seconds of activity, the PC will recognize the mbed Microcontroller as a standard USB drive.
3. Press the button on the sensor board
Press and hold the only button on the sensor board for about half a second to wake the PMIC and turn on the board.
4. Click the MBED.HTM link to get logged in
Go to the new USB Drive, and click MBED.HTM to open it in a web browser.
If you do not have an mbed account, choose "Signup", and create your mbed Account. Otherwise, log in with your normal username and password.
This will give you access to the website, tools, libraries and documentation.
PC Configuration
Your mbed Microcontroller can appear on your computer as a serial port. On Mac and Linux, this will happen by default. For Windows, you need to install a driver:
Windows
See Windows-serial-configuration for full details about setting up Windows for serial communication with your mbed Microcontroller. Note: this is for the virtual serial port built into the HDK programming adapter
From a host PC to communicate with mbed you will need a terminal application. This allows the mbed Microcontroller to print to your PC screen, and for you to send characters back to your mbed.
- Terminals - Using Terminal applications to communicate between the Host PC and the mbed Micrcontroller
Some terminal programs (e.g. TeraTerm) list the available serial ports by name. However, if you do need to know the identity of the serial port so that you can attach a terminal or an application to it:
| Windows | Mac | Linux | ||||
| Find the identity of the COM port by opening ''Device Manager''. To do this navigate ''Start -> Control Panel -> System -> Hardware -> Device Manager''. | To find the device name under Mac OS X, use the command ''ls /dev/tty.usbmodem*'' | To find the device name under Linux, use the command ''ls /dev/ttyACM*'' | ||||
 |  |  |
Downloading A program
1. Connect sensor and programming adapter to PC
- Connect the programming adapter to the sensor board as shown below.
- Connect the PC to the programming adapter through the micro USB connector marked "HDK"
- Press and hold the power button for at least a half second to turn the board on.

2. Save a program binary (.bin) to the Platform
Download the demonstration program binary:
- MAX32620HSP:hsp_pmic_demo_max32620hsp.bin
Note: the source code for this program will be seen in the next section.
Save the program binary file to your mbed Microcontroller Disk, just like you would with a normal USB disk. The Status LED will flash as the PC writes the file to the Microcontroller disk. The file is now consumed. Be sure that you turned the sensor board on before saving the file.
3. Hello World!
The Microcontroller is now running the program; flashing LED1 forever! If you reset the Microcontroller, or disconnect and reconnect the power, the program will simply restart.
Example Programs
Import programHSP_RPC_GUI
MAX32620HSP (MAXREFDES100) RPC Example for Graphical User Interface
Last commit 25 Apr 2017 by ![]() Maxim Integrated
Maxim Integrated
Import programmbed_blinky
The example program for mbed pin-compatible platforms
Last commit 08 Apr 2019 by  Mbed
Mbed
Import programHSP_PMIC_Demo
Program to demonstrate how to configure the PMIC on the MAX32620HSP (MAXREFDES100#)
Last commit 20 Oct 2016 by ![]() Maxim Integrated
Maxim Integrated
Where Next
Follow the guide to creating your own programs using the online compiler
Technical Reference
See the MAXREFDES100# product page for more information.
Data Sheets
- MAX32620 Product Page
- MAX30003 Product Page
- MAX30101 Product Page
- MAX30205 Product Page
- MAX14720 Product Page
You need to log in to post a discussion
Discussion topics
| Topic | Replies | Last post |
|---|---|---|
| How to modify power-on process for the MAXREFDES100 / MAX32620HSP? | 2 |
09 Jun 2017
by
 Tushar Mazumder
|
Questions
See more related questions
To compile a program for this board using Mbed CLI, use max32620hsp as the target name.
Board Partner
Maxim Integrated
Maxim's microcontrollers provide low-power, efficient, and secure solutions for challenging embedded applications.
Mbed OS support
- Mbed OS 5.4
- Mbed OS 5.5
- Mbed OS 5.6
- Mbed OS 5.7
- Mbed OS 5.8
Example programs