L-Tek FF-LPC546XX
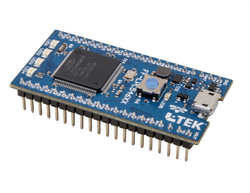
The L-Tek FF-LPC546XX is a small, 40-pin development board intended for prototyping general microcontroller applications. It is based on a low power, peripheral rich and debug capable NXP LPC54606 microcontroller, enhanced with power efficient up to 180MHz ARM® Cortex®-M4 core, with integrated DAPLink interface for complete debugging experience.

For more information contact L-Tek: info@ltek.si
Overview
The L-Tek FF-LPC546XX is an ARM® mbed™ development platform using 32-bit, up to 180 MHz ARM® Cortex®-M4 core based LPC546XX family MCU, with multiple high-speed connectivity options, advanced timers, and analog features.
It is the latest in series of mbed Microcontrollers, which supports Ethernet, USB, and the flexibility of lots of peripheral interfaces and FLASH memory (external 32-Mbit SPI serial Flash memory onboard).
Conveniently integrated with a DAPLink programming/debug interface and packaged as a small 40-pin 0.1" DIP, this platform can be used to prototype applications using a wide range of IO boards and peripherals supported by mbed in the mbed Component library, such as mbed Application Board.
Offline Development Options
It is possible to develop offline using mbed-cli and the Eclipse IDE. See wiki page for more information.

The pinout diagram above shows the commonly used interfaces and their locations. In addition to their stated functions, all GPIO pins can also be used as DigitalIn and DigitalOut interfaces.
p15:
- supports analog input for measuring 4-20 mA
- supports digital input only in pull down mode
- does not support digital output
Features
- NXP LPC546XX Microcontroller
- High performance ARM® Cortex™-M4 Core running up to @180 MHz
- 512 kB Flash, 200 kB SRAM, 16 kB EEPROM
- SPI (2)
- UART (2)
- I2C (2)
- PWM (6)
- ADC (6)
- GPIOs
- CAN (1)
- USB (1)
- External Peripherals
- LAN8720A Ethernet Transceiver
- AT45DB321E 32-Mbit SPI Serial Flash Memory
- Prototyping form-factor
- 40-pin 0.1" pitch DIP package, 54x26 mm
- 5 V USB or 4.5-24.0 V supply
- All IO pins are 3.3 V tolerant
- Built-in USB drag 'n' drop FLASH programmer
Note
Please note that support for the following features of FF-LPC546xx are currently in development in Mbed OS. Schedule for release is TBD.
- CAN
- High and full speed USB ports
- Quad-SPI flash
- PWM
- MBED2
FIRMWARE UPGRADE - DAPLink Interface
The FF-LPC546XX includes the DAPLink interface. Firmware for the FF-LPC546XX will be included in DAPLink releases. To update the interface firmware on your FF-LPC546XX, follow these steps:
- Hold 'RESET' button down on FF-LPC546XX
- Plug the FF-LPC546XX into PC via micro USB
- Observe drive "CRP 'DISABLD'
- Open the drive, and delete the file called "firmware.bin"
- Download the required firmware
- Copy the .bin file onto the "CRP DISABLD" drive.
- On Windows, replace firmware.bin with the above firmware
- On Linux/Mac, use command: dd if={new_firmware.bin} of={firmware.bin} conv=notrunc
- Unplug your FF-LPC546XX, and plug it back in
- It should now appear as a disk drive called FF-LPC546XX (DAPLink)
You can re-program your FF-LPC546XX at any time by plugging it in with the button held down. This will cause it to appear as the "CRP DISABLD" drive, at which point you can follow the steps above.
Technical Reference
Data Sheets
- LPC546XX MCU family Web Page
- LPC546XX Product Data Sheet
- LPC546XX User Manual
- LAN8720A Data Sheet
- AT45DB321E Data Sheet
Getting Started with mbed
1. Connect your microcontroller to a PC
Use the USB lead to connect your mbed to a PC. The status light will come on, indicating it has power. After a few seconds of activity, the PC will recognise the mbed Microcontroller as a standard USB drive.
 |  |
| Windows XP example | Mac OS X example |
2. Click the MBED.HTM link to get logged in
Go to the new USB Drive, and click MBED.HTM to open it in a web browser.
If you do not have an mbed account, choose "Signup", and create your mbed Account. Otherwise, log in with your normal username and password.
This will give you access to the website, tools, libraries and documentation.
PC Configuration
Your mbed Microcontroller can appear on your computer as a serial port. On Mac and Linux, this will happen by default. For Windows, you need to install a driver:
Windows
See Windows-serial-configuration for full details about setting up Windows for serial communication with your mbed Microcontroller
From a host PC to communicate with mbed you will need a terminal application. This allows the mbed Microcontroller to print to your PC screen, and for you to send characters back to your mbed.
- Terminals - Using Terminal applications to communicate between the Host PC and the mbed Micrcontroller
Some terminal programs (e.g. TeraTerm) list the available serial ports by name. However, if you do need to know the identity of the serial port so that you can attach a terminal or an application to it:
| Windows | Mac | Linux | ||||
| Find the identity of the COM port by opening ''Device Manager''. To do this navigate ''Start -> Control Panel -> System -> Hardware -> Device Manager''. | To find the device name under Mac OS X, use the command ''ls /dev/tty.usbmodem*'' | To find the device name under Linux, use the command ''ls /dev/ttyACM*'' | ||||
 |  |  |
On both Mac and Linux PCs, the port with the higher number will be the USB serial debug port. For example, if you have Linux and get ports /dev/ttyACM0 and /dev/ttyACM1, ttyACM1 will be the debug port and ttyACM0 the AT command/secondary port.
Example Programs
Hello World!
[Repository '/teams/mbed-os-examples/code/mbed-os-example-blinky/' not found]
Blinky
This is mbed 2 example and is currently not supported. Coming soon!
Import programmbed_blinky
The example program for mbed pin-compatible platforms
Last commit 08 Apr 2019 by  Mbed
Mbed
Where Next
Follow the guide to creating your own programs using the online compiler
You need to log in to post a discussion
Discussion topics
| Topic | Replies | Last post |
|---|---|---|
| FF-LPC546, L-Tek keypad 4*3 program control 7 segement display | 0 |
06 Feb 2019
by
 Seoul Laing Win
|
Questions
 Douglas S
 5 years, 10 months ago
To compile a program for this board using Mbed CLI, use FF_LPC546XX as the target name.
Board Partner
L-Tek
L-Tek is engaged in the development and production of electronic modules and electromechanical components for the electronics industry.
Silicon Partner
NXP
NXP is a leading semiconductor company founded by Philips more than 50 years ago.
 Mbed Enabled
- Baseline
Mbed OS support
- Mbed OS 5.10
- Mbed OS 5.11
- Mbed OS 5.12
- Mbed OS 5.13
- Mbed OS 5.14
- Mbed OS 5.15
- Mbed OS 5.8
- Mbed OS 5.9
- Mbed OS 6.0
- Mbed OS 6.1
- Mbed OS 6.10
- Mbed OS 6.11
- Mbed OS 6.12
- Mbed OS 6.13
- Mbed OS 6.14
- Mbed OS 6.15
- Mbed OS 6.2
- Mbed OS 6.3
- Mbed OS 6.4
- Mbed OS 6.5
- Mbed OS 6.6
- Mbed OS 6.7
- Mbed OS 6.8
- Mbed OS 6.9
CMSIS support
Find documentation, software examples and the CMSIS Board Support Pack.
L-Tek FF-LPC546XX on keil.arm.com