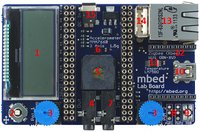
mbed Application Board
Application board for mbed NXP LPC1768
Hello World
Import programapp-board-LCD
Example program printing text to the LCD on the mbed application board
Last commit 05 Feb 2014 by  Chris Styles
Library
Notes
The new application board has been designed to enable the maximum number of potential experiments and projects, with the minimum footprint.
 |  |
Although that there are 2x20 way headers for the mbed for jumper wiring pins off-board, it's a fairly well encapsulated platform.
Where to buy
Feature list
- 128x32 Graphics LCD
- 5 way joystick
- 2 x Potentiometers
- 3.5mm Audio jack (Analog Out)
- Speaker, PWM connected
- 3 Axis +/1 1.5g Accelerometer
- 3.5mm Audio jack (Analog In)
- 2 x Servo motor headers
- RGB LED, PWM connected
- USB-mini-B Connector
- Temperature sensor
- Socket for for Xbee (Zigbee) or RN-XV (Wifi)
- RJ45 Ethernet Connector
- USB-A Connector
- 1.3mm DC Jack input
1. 128x32 LCD
An example program to print text and variables to the LCD
Import program
00001 #include "mbed.h"
00002 #include "C12832.h"
00003
00004
00005 C12832 lcd(p5, p7, p6, p8, p11);
00006
00007 int main()
00008 {
00009     int j=0;
00010     lcd.cls();
00011     lcd.locate(0,3);
00012     lcd.printf("mbed application board!");
00013
00014     while(true) {   // this is the third thread
00015         lcd.locate(0,15);
00016         lcd.printf("Counting : %d",j);
00017         j++;
00018         wait(1.0);
00019     }
00020 }
A full featured test program :
Demo for using bitmap graphic :
2. Joystick
An example program for the mbed application board that uses the joystick button. LED1,2,3,4 light in sequence with up, down, left, right, and pushing the button lights them all (as a 80's computer gamer, I want to call this "fire!")
Note: that the orientation is looking at the screen in landscape, with the row of connectors at the bottom
Import programkill_the_bit
Classic Kill the Bit game for the application board. Press joystick down to kill off the leftmost LED, but if your timing is off more LEDs turn on. LEDs flash and speaker beeps when all LEDs are off.
Last commit 26 Nov 2013 by  jim hamblen
3. 2 x Potentiometers
To be completed
4. Analog Out
Plug in a pair of earphones.
Play music from a *.wav audio file on PC speakers. See Application Board Waveplayer Demo for complete instructions.
Import programAppBoard_Waveplayer
A wave player demo setup for the mbed application board. Reads a wave file from a USB flash drive, and outputs to the onboard speaker (very low volume) and the analog audio out jack that can be connected to a set of PC speakers for more volume. A wave file for the demo is available at http://mbed.org/media/uploads/4180_1/sample.wav. Copy it to the USB drive. See http://mbed.org/users/4180_1/notebook/application-board-waveplayer-demo/ for more details and instructions.
Last commit 01 Nov 2013 by jim hamblen
5. Speaker
A frequency sweep. Press the fire button to to play it again!
Play music from a *.wav audio file on the speaker. See Application Board Waveplayer Demo for complete instructions.
Import programAppBoard_Waveplayer
A wave player demo setup for the mbed application board. Reads a wave file from a USB flash drive, and outputs to the onboard speaker (very low volume) and the analog audio out jack that can be connected to a set of PC speakers for more volume. A wave file for the demo is available at http://mbed.org/media/uploads/4180_1/sample.wav. Copy it to the USB drive. See http://mbed.org/users/4180_1/notebook/application-board-waveplayer-demo/ for more details and instructions.
Last commit 01 Nov 2013 by jim hamblen
6. 3 Axis Accelerometer
Import program
00001 //Uses the measured z-acceleration to drive leds 2 and 3 of the mbed
00002
00003 #include "mbed.h"
00004 #include "MMA7660.h"
00005
00006 MMA7660 MMA(p28, p27);
00007
00008 DigitalOut connectionLed(LED1);
00009 PwmOut Zaxis_p(LED2);
00010 PwmOut Zaxis_n(LED3);
00011
00012 int main() {
00013     if (MMA.testConnection())
00014         connectionLed = 1;
00015
00016     while(1) {
00017         Zaxis_p = MMA.z();
00018         Zaxis_n = -MMA.z();
00019     }
00020
00021 }
Import libraryMMA7660
Library for the MMA7660 triple axis accelerometer
Last commit 13 May 2014 by  Erik -
Import programapp-board-Bubble-Level
This demo uses the application board’s three axis accelerometer and the LCD display working in graphics mode to build an electronic version of a bubble level.
Last commit 22 Sep 2013 by jim hamblen
7. Analog In
To be completed
8. Servo Motor
An example program that uses the two potentiometers to set the position of the servo motors. You'll need to supply 6v into the DC socket, (1.3mm, center/tip positive)
Import libraryServo
A class to control a model R/C servo, using a PwmOut
Last commit 02 Sep 2010 by  Simon Ford
9. RGB LED
An example program that cycles the on board RGB LED through various colours.
Information
The RGB LED is common anode, so that "0" is on, and "1" is off. For PWM, the closer to 0.0 the brighter, the closer to 1.0 the dimmer. use (1.0 - value) to invert.
Import program
00001 #include "mbed.h"
00002
00003 PwmOut r (p23);
00004 PwmOut g (p24);
00005 PwmOut b (p25);
00006
00007 int main()
00008 {
00009     r.period(0.001);
00010     while(1) {
00011         for(float i = 0.0; i < 1.0 ; i += 0.001) {
00012             float p = 3 * i;
00013             r = 1.0 - ((p < 1.0) ? 1.0 - p : (p > 2.0) ? p - 2.0 : 0.0);
00014             g = 1.0 - ((p < 1.0) ? p : (p > 2.0) ? 0.0 : 2.0 - p);
00015             b = 1.0 - ((p < 1.0) ? 0.0 : (p > 2.0) ? 3.0 - p : p - 1.0);  ;
00016             wait (0.01);
00017         }
00018     }
00019 }
Import programapp-board-RGB2
Example program to cycle the RGB LED on the mbed application board through all colours
Last commit 05 Dec 2012 by  Peter Drescher
10. USB Device
Import program
00001 #include "mbed.h"
00002 #include "USBMouse.h"
00003
00004 USBMouse mouse;
00005
00006 int main() {
00007     int16_t x = 0;
00008     int16_t y = 0;
00009     int32_t radius = 10;
00010     int32_t angle = 0;
00011
00012     while (1) {
00013         x = cos((double)angle*3.14/180.0)*radius;
00014         y = sin((double)angle*3.14/180.0)*radius;
00015
00016         mouse.move(x, y);
00017         angle += 3;
00018         wait(0.001);
00019     }
00020 }
Import programUSBKeyboard_HelloWorld
USBKeyboard Hello World
Last commit 01 Mar 2013 by  Samuel Mokrani
11. LM75B Temperature sensor
An example program to read the current temperature from the LM75B and display it on the LCD
Import program
00001 #include "mbed.h"
00002 #include "LM75B.h"
00003 #include "C12832.h"
00004
00005 C12832 lcd(p5, p7, p6, p8, p11);
00006
00007 LM75B sensor(p28,p27);
00008 Serial pc(USBTX,USBRX);
00009
00010 int main ()
00011 {
00012
00013     //Try to open the LM75B
00014     if (sensor.open()) {
00015         printf("Device detected!\n");
00016
00017         while (1) {
00018             lcd.cls();
00019             lcd.locate(0,3);
00020             lcd.printf("Temp = %.3f\n", (float)sensor);
00021             wait(1.0);
00022         }
00023
00024     } else {
00025         error("Device not detected!\n");
00026     }
00027
00028 }
Import libraryLM75B
A simply library for the LM75B I2C temperature sensor
Last commit 26 Oct 2012 by Chris Styles
12. Xbee socket
Websocket over Wifly - Hello World - This example send messages to the mbed websocker server over a wifi connection using the RN-XV Wifly module.
The output can be seen at
Import program
00001 #include "mbed.h"
00002 #include "WiflyInterface.h"
00003 #include "Websocket.h"
00004 #include "LM75B.h"
00005 #include "MMA7660.h"
00006
00007
00008 /* wifly interface:
00009 *     - p9 and p10 are for the serial communication
00010 *     - p30 is for the reset pin
00011 *     - p29 is for the connection status
00012 *     - "mbed" is the ssid of the network
00013 *     - "password" is the password
00014 *     - WPA is the security
00015 */
00016
00017 WiflyInterface wifly(p9, p10, p30, p29, "mbed", "password", WPA);
00018
00019 // accelerometer
00020 MMA7660 acc(p28, p27);
00021
00022 // temperature sensor
00023 LM75B tmp(p28,p27);
00024
00025
00026 int main()
00027 {
00028     char json_str[100];
00029
00030     wifly.init(); //Use DHCP
00031     while (!wifly.connect());
00032     printf("IP Address is %s\n\r", wifly.getIPAddress());
00033
00034     // See the output on http://sockets.mbed.org/app-board/viewer
00035     Websocket ws("ws://sockets.mbed.org:443/ws/app-board/wo");
00036
00037     // connect WS server
00038     while (!ws.connect());
00039
00040     while (1) {
00041         // create json string with acc/tmp data
00042         sprintf(json_str, "{\"id\":\"app_board_wifly_EW2013\",\"ax\":%d,\"ay\":%d,\"az\":%d, \"tmp\":%d}", (int)(acc.x()*360), (int)(acc.y()*360), (int)(acc.z()*360), (int)tmp.read());
00043
00044         // send str
00045         ws.send(json_str);
00046
00047         wait(0.1);
00048     }
00049 }
HTTP Client over Wifly - Hello World
Import programapp-board-Wifly-HTTPClient
An example program using the HTTP Client over wifly, creat
Last commit 26 Oct 2012 by Chris Styles
13. Ethernet Interface
NTP Hello World - This example fetches the the time using NTP, and prints it over the USB Serial interface. Be sure to have been through /handbook/SerialPC to make sure you have a serial console
Import programNTPClient_HelloWorld
Simple example demonstrating how to use the NTP Client to set the time
Last commit 05 Aug 2012 by  Donatien Garnier
HTTP Client Hello World
Import programHTTPClient_HelloWorld
Simple example demonstrating how to use GET & POST requests with the HTTP Client
Last commit 30 Aug 2012 by Donatien Garnier
Websocket Accelerometer-Temperature demo - This example streams acceleration and temperature data to a websocket server. Visit app-board viewer to have a real time feed.
Import programapp-board-Ethernet-Websocket
Modifed version from Samuel Mokrani Changed URL to push data to sensor page Added visualisation page URL as a comment
Last commit 08 Feb 2013 by Chris Styles
WiFly-xively-jumpstart-demo - Xively Jumpstart demo with WiFly module.
Import programWiFly-xively-jumpstart-demo
Xively Jumpstart Demo with WiFly module
Last commit 28 Jan 2014 by  mbed official
14. USB Host
Important!
When using the mbed as a USB host, 15k Ohm pull down resistors are needed on the D+ and D- signals, as per the USB specification. This can be achieved by switching both switches the DIP switch to the "USB Host" position

Flash disk Hello World This example program writes the file "test.csv" to a USB flash stick, taking 100 samples (20 per second for 5 seconds) from pot1. The resulting CSV file can easily be plotted as a graph in Excel!
Import program
00001 #include "mbed.h"
00002 #include "MSCFileSystem.h"
00003
00004 MSCFileSystem fs("fs");
00005 DigitalOut led(LED1);
00006 AnalogIn pot1(p19);
00007
00008 int main()
00009 {
00010     FILE *fp = fopen("/fs/test.csv","w");
00011     printf("Create filehandle for test.csv\n");
00012
00013     printf("Writing to file\n");
00014     for (int i=0; i<100; i++)  {
00015         fprintf(fp,"%.2f\n",pot1.read());
00016         wait(0.05);
00017         led=!led;
00018     }
00019
00020     fclose(fp);
00021     printf("Close the handle\n");
00022     led=1;
00023 }
Details
| Form factor | 55mm x 86mm x 19mm (with mbed) |
| 128x32 Graphics LCD, SPI Interface | Newhaven C12832A1Z MOSI:p5 nRESET:p6 SCK:p7 A0:p8 |
| 3 Axis +/1 1.5g Accelerometer,I2C Interface | Freescale MMA7660 SCL:p27 SDA:p28 Address:0x98 |
| Temperature sensor | LM75B SCL:p27 SDA:p28 Address:0x90 |
| 5 way Joystick | ALPS SKRHADE010 Down:p12 Left:p13 Centre:p14 Up:p15 Right:p16 |
| 2 x Potentiometers | Iskra PNZ10ZA, 10k Pot 1 (left) :p19 Pot 2 (right):p20 |
| 2 x 3.5mm Audio jack (Analog In/Out) | CUI Inc SJ-3523-SMT Analog In:p17 Analog Out:p18 |
| 2 x Servo motor headers | PWM1:p22 PWM2:p21 |
| RGB LED, PWM connected | Cree Inc CLV1A-FKB Red:p23 Green:p24 Blue:p25 |
| Speaker, PWM Connected | MULTICOMP MCSMT-8030B-3717 p26 |
| USB-B Connector | Neltron, 5075ABMR-05-SM1 |
| USB-A Connector | MULTICOMP,USB-A-V |
| RJ45 Ethernet conenctor | Pulse Jack, J00-0045NL |
| 1.3mm DC Jack input | CLIFF, FC68145S 1.3mm 6v-9v Centre positive |
Schematics
You need to log in to post a discussion
Questions
 David Lenihan
 4 years, 9 months ago
Board Partner

Mbed
Mbed is the fastest way to create devices with Arm-based microcontrollers. This team is for those that bring you Mbed.