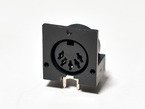
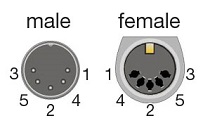
5-Pin DIN MIDI Connector
A small library that sets up an input/output converter between the serial 5-Pin DIN MIDI connector and USB MIDI.
Hello World
Import program5-PinMIDIDemo
Example program for the Midi5Pin library.
Last commit 22 Oct 2015 by  Marius Petrut
Library
Import libraryMidi5Pin
Simple mbed 5-pin DIN to USB MIDI Converter library
Last commit 22 Oct 2015 by Marius Petrut
Pinout
Datasheet
http://www.adafruit.com/datasheets/SDS-XXJ.pdfNotes

Background
MIDI is a standard of interconnection between digital musical devices. This serial protocol carries commands that are used to control some parameters of the receiver device. For example, a Note On command sent from a MIDI piano keyboard controller instrument instructs a certain sound producing device (e.g. a synthesizer) to play the specified musical note. MIDI is the de facto standard for interconnecting controllers and sound-producing devices in the music studio.
The MIDI protocol works over a serial connection with a specified baud rate of 31250 when connected through the legacy 5-pin connector. Almost all professional MIDI music devices such as piano keyboard controllers come with the classic 5-pin connector.
Introduction
This page shows how to build a 5-pin DIN to USB MIDI converter using one 5-pin connector for input and one 5-pin connector for output. This is really useful when we have an instrument (like a piano keyboard) that doesn't have a USB MIDI connection and we want to use it as a MIDI controller to play virtual instruments on the computer.
Components
We will use two 5-Pin connectors from Adafruit, namely the Adafruit Breadboard-friendly MIDI Jack (5-pin DIN) (datasheet available here).


In order to successfully build a bridge between the serial UART signal coming from the MIDI instrument and Mbed's virtual USB port we need an high-speed opto-isolator circuit to separate the transmitter and receiver ports, according to the official MIDI specification.
We will use the 6N138 High Speed Optocoupler from Vishay Semiconductors (datasheed available here).


In addition, we also need four resistors, two 220 ohm, a 470 ohm, and a 10kohm, and a 1N4148 diode. For the example program, two simple pushbuttons and a Sharp IR distance sensor (datasheet here) were also used.
Wiring diagram for MIDI Input/Output connections:

The circuit assembled on a breadboard

The Midi5Pin Library
Import libraryMidi5Pin
Simple mbed 5-pin DIN to USB MIDI Converter library
Last commit 22 Oct 2015 by Marius Petrut
Midi5Pin.h
/* Simple mbed 5-pin DIN to USB MIDI Converter library
Marius Petrut, 2015
*/

#ifndef MBED_MIDI5PIN_H
#define MBED_MIDI5PIN_H

#include "mbed.h"

class Midi5Pin {
public:
    // Create a Midi5Pin object with the specified
    // transmit and receive pins
    Midi5Pin(PinName txPin, PinName rxPin);

    // Send a command to the 5-pin output port
    void write(char command, char param1, char param2);

    // Send a noteOn MIDI message to the 5-pin output
    void noteOn(char note, char velocity);

    // Send a noteOff MIDI message to the 5-pin output
    void noteOff(char note);

    // Send a continuous control message to the 5-pin output
    void contCtrl(char ccNumber, char value);

    // Read from the 5-pin input connection and send
    // it to the PC through the USB virtual com port
    void read();

private:
    Serial _pc;
    Serial _uart5pin;
};

#endif
Midi5Pin.cpp
/* Simple mbed 5-pin DIN to USB MIDI Converter library
Marius Petrut, 2015
*/

#include "Midi5Pin.h"
#include "mbed.h"

#define NOTE_ON 144
#define CONT_CTRL 176

Midi5Pin::Midi5Pin(PinName txPin, PinName rxPin) :
    _pc(USBTX, USBRX), _uart5pin(txPin, rxPin) {
        _pc.baud(256000);
        // 31250 is the official specification
        _uart5pin.baud(31250);
    }

void Midi5Pin::write(char command, char param1, char param2) {
    _uart5pin.putc(command);
    _uart5pin.putc(param1);
    _uart5pin.putc(param2);
}

void Midi5Pin::noteOn(char note, char velocity) {
    _uart5pin.putc(NOTE_ON);
    _uart5pin.putc(note);
    _uart5pin.putc(velocity);
}

void Midi5Pin::noteOff(char note) {
    _uart5pin.putc(NOTE_ON);
    _uart5pin.putc(note);
    _uart5pin.putc(0);
}

void Midi5Pin::contCtrl(char ccNumber, char value) {
    _uart5pin.putc(CONT_CTRL);
    _uart5pin.putc(ccNumber);
    _uart5pin.putc(value);
}

void Midi5Pin::read() {
    if (_uart5pin.readable()) {
        _pc.putc(_uart5pin.getc());
    }
}
Demo program:
The following demo code shows how to read from the MIDI UART input and send the messages to the computer through USB. It also shows how to send messages from the computer or Mbed to the serial UART output port. An IR distance sensor was connected to pin 20 and it was used to send continuous controller messages that change some parameter (i.e. the filter of a synthesizer).
Import program5-PinMIDIDemo
Example program for the Midi5Pin library.
Last commit 22 Oct 2015 by Marius Petrut
main.cpp
// This demo program showcases the Midi5Pin library which
// provides simple USB MIDI input/ouput through MIDI 5-Pin
// DIN connectors

#include "mbed.h"
#include "DebounceIn.h"
#include "Midi5Pin.h"

AnalogIn distSensor(p20);
DebounceIn btn_on(p27);
DebounceIn btn_off(p26);
Midi5Pin midi(p13, p14);

int main() {
    // Initialize buttons
    btn_on.mode(PullUp);
    btn_off.mode(PullUp);
    wait(.001);
    int old_btn_on=0, new_btn_on;
    int old_btn_off=0, new_btn_off;

    char controlMessage = (char)(distSensor*127);

    while (1) {
        // This reads the serial UART (5-pin Input) and outputs
        // to the USB virtual com port
        midi.read();

        // When this button is pressed, MIDI message is sent to the
        // 5-Pin serial Output
        new_btn_on = btn_on;
        if ((new_btn_on==0) && (old_btn_on==1)) midi.noteOn(60, 100);
        old_btn_on = new_btn_on;

        new_btn_off = btn_off;
        if ((new_btn_off==0) && (old_btn_off==1)) midi.noteOff(60);
        old_btn_off = new_btn_off;

        // Send continuous control messages from the IR distance
        // sensor to the 5-pin Output
        if ( abs((char)(distSensor*127)-controlMessage) > 2) {
            midi.contCtrl(14, (char)(distSensor*127));
        }
    }
}
Connection to computer
At this point, we have a bridge between the serial UART and the USB port. In order to send MIDI messages to a software instrument on the computer, we need to use the Hairless MIDI to Serial Bridge software which will take care of the serial-to-MIDI bridging inside the computer.

We also need a virtual MIDI loopback driver in order to route the MIDI signal from the Hairless Serial Bridge software to our music software of choice. A free MIDI loopback driver option is loopMIDI by Tobias Erichsen. Once installed, simply add a port which will appear in all the music applications, as seen below.

Demo Video
You need to log in to post a discussion