SmartGPU2
http://developer.mbed.org/cookbook/SMARTGPU2
Hello World
Import programTriangles_SG2
Triangle Drawing Demo - MBED + SmartGPU2 board
Last commit 17 Apr 2014 by  Vizic Technologies
Library
Import librarySMARTGPU2
This is the Official SmartGPU 2 processor board library to use with MBED boards!!!
Last commit 17 Apr 2014 by Vizic Technologies
Datasheet
http://www.vizictechnologies.com/?_escaped_fragment_=smartgpu-2/c1rc2#!smartgpu-2/c1rc2Notes
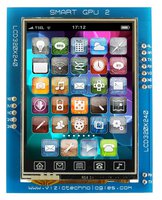
SmartGPU2 intelligent embedded graphics, audio, touchscreen and full datalogger processor!!!

Presentation
This page presents a library to use a SmartGPU 2 intelligent embedded graphics processor with a 2.4" touch screen from Vizic Technologies: http://www.vizictechnologies.com/#!smartgpu-2/c1rc2 The LCD module features are :
- 2.4“ LCD capable of displaying 262,144 colors.
- Easy 5 pin interface to any host device: VCC, TX, RX, GND, RESET.
- Video Playback(up to 60FPS) and Audio(CD Quality) capable.
- On-board uSD/uSDHC memory card adaptor compatible with FAT(windows PC), Support up to 32GB for storing images(BMP,JPG), text, songs, videos,etc.
- Integrated File management/Data logger functions(Create, Read, Write, etc), with LFN support
- Integrated Touch screen driver(controller), 10 bit accuracy touch.
- Sleep mode.
- Integrated RTC(real time clock) + 16Kb EEPROM
- BaudRate speed up to 2Meg bps, 8 bits, no parity, 1 stop bit.
- 5V and 3V3 I/O compatible,3V3 power supply.
- External reset switch
- Low-cost LCD display graphics user interface solution.
- Comprehensive set of built in high level graphics functions and algorithms that can draw lines, circles, text, and much more.
- 13 different fonts and sizes.
- compatible with any microcontroller(8051,pic,AVR,ARM,mbed,FPGAs,Arduino,PC) and development boards with a UART/USART.


Comparison of processors loads:

Connecting the SmartGPU 2
- You will need to power the screen with 3.3V.
- You can use any of the 2 pairs of TX and RX pins(they are internally wired) for serial communication.
- If you use an external power source, make sure the mbed ground and external power ground are linked otherwise the serial commands will not be received correctly by the screen.
- Use one of the three Serial pairs of pins (p9, p 10) (p13, p14) or (p27, p28) from the mbed to connect them with the SmartGPU2(up to 3 SmartGPUs can be connected simultaneously to mbed!).
- Use one pin for reseting the screen.
- The way to use the library is SmartGPU2 lcd(TXPIN,RXPIN,RESETPIN); (TX,RX,Reset)

SmartGPU2 mbed Library
You can import the SmartGPU2 mbed Library from here :
Import librarySMARTGPU2
This is the Official SmartGPU 2 processor board library to use with MBED boards!!!
Last commit 17 Apr 2014 by Vizic Technologies
Once it is imported to your program folder, just insert the #include "SMARTGPU2.h" in your main.cpp and create the object with SMARTGPU2 lcd(TXPIN,RXPIN,RESETPIN); (TX,RX,Reset)
Example Code
main.cpp
//main.cpp
#include "mbed.h"
#include "SMARTGPU2.h"

SMARTGPU2 lcd(TXPIN, RXPIN, RESETPIN);        //(TX,RX,Reset), pins are defined in "smartgpu2.h"

int main(){
 lcd.reset();                    //physically reset SMARTGPU
 lcd.start();                    //initialize the SMARTGPU processor
 while(1){                       //loop forever
  lcd.erase();                                         //erase screen
  lcd.putPixel(300,200,CYAN);                          //draw a pixel
  lcd.drawLine(50,50,150,200,WHITE);                   //draw a line
  lcd.drawRectangle(10,10,200,180,RED,UNFILL);         //draw a rectangle
  lcd.drawCircle(160,120,50,GREEN,UNFILL);             //draw a circle
  lcd.drawTriangle(15,15,200,210,180,70,BLUE,UNFILL);  //draw a triangle
  lcd.putLetter(100,100,MAGENTA,FONT3,TRANS,'E',&L);   //write a single letter 'E'
  lcd.imageBMPSD(0,0,"hydra320");                      //Open image "hydra320.bmp" stored on the microSD card
  lcd.imageJPGSD(0,0,"Koala320");                      //Open image "Koala320.jpg" stored on the microSD card
  lcd.string(10,10,300,220,YELLOW,FONT3,TRANS,"String test for SMARTGPU",&L);  //write a string on the screen
  lcd.stringSD(5,50,300,230,MAGENTA,FONT3,TRANS,BEGINNING,ALLCONTENTS,"text1");  //call the text file "text1.txt" previously stored on the micro SD card
  lcd.playVideoSD(0,0,500);                            //play 500 frames from the video in the microSD card
 }
}
Videos
Images and microSD contents can be downloaded from here: http://www.vizictechnologies.com/#!smartgpu-2/c1rc2
Demos & Source Code
To make it simpler, you can import those demos 100% ready to compile and load:
Beginner:
Import programEllipses_SG2
Ellipses - MBED + SmartGPU2 board
Last commit 17 Apr 2014 by Vizic Technologies
Import programTriangles_SG2
Triangle Drawing Demo - MBED + SmartGPU2 board
Last commit 17 Apr 2014 by Vizic Technologies
Import programGradientRect_SG2
Gradient Rectangles Demo - MBED + SmartGPU2 board
Last commit 17 Apr 2014 by Vizic Technologies
Import programWindow_SG2
Simple Window Demo - MBED + SmartGPU2 board
Last commit 17 Apr 2014 by Vizic Technologies
Import programHouse_SG2
House Drawing Demo - MBED + SmartGPU2 board
Last commit 17 Apr 2014 by Vizic Technologies
Import programObjects_SG2
SmartGPU2 Hardware Objects Demo - MBED + SmartGPU2 board
Last commit 17 Apr 2014 by Vizic Technologies
Import programSimplePaint_SG2
Simple Paint Demo - MBED + SmartGPU2 board
Last commit 18 Apr 2014 by Vizic Technologies
Medium:
Import programBounceBalls_SG2
Bouncing Balls - MBED + SmartGPU2 board
Last commit 17 Apr 2014 by Vizic Technologies
Import programSimpleClock_SG2
Simple Clock Demo - MBED + SmartGPU2 board
Last commit 18 Apr 2014 by Vizic Technologies
Import programPhotoframe_SG2
BMP Images Photo Frame Demo - MBED + SmartGPU2 board
Last commit 18 Apr 2014 by Vizic Technologies
Import programGalleryJPG_SG2
JPG Images decompression from the microSD card using SmartGPU2 board - MBED + SmartGPU2 board
Last commit 18 Apr 2014 by Vizic Technologies
Import programPaintPro_SG2
Paint Pro Demo with stylus drawing - MBED + SmartGPU2 board
Last commit 17 Apr 2014 by Vizic Technologies
Import programListContents_SG2
List File Contents on a microSD card Demo, FAT16/FAT32 - MBED + SmartGPU2 board
Last commit 17 Apr 2014 by Vizic Technologies
Import programKeypad_SG2
QWERTY Keypad Touchscreen LCD Demo - MBED + SmartGPU2 board
Last commit 18 Apr 2014 by Vizic Technologies
Import programFileCreation_SG2
File Creation on microSD Card Demo - MBED + SmartGPU2 board
Last commit 17 Apr 2014 by Vizic Technologies
Import programEEPROM_SG2
EEPROM Demo - MBED + SmartGPU2 board
Last commit 17 Apr 2014 by Vizic Technologies
Import programPongGame_SG2
Pong Video Game Demo - MBED + SmartGPU2 board
Last commit 17 Apr 2014 by Vizic Technologies
Advanced:
Import programFullGUI_SG2
Full IPOD Like GUI Demo - MBED + SmartGPU2 board
Last commit 17 Apr 2014 by Vizic Technologies
Work in progress
- The library need some extra documentation, but it's 100% functional
- Be sure to post any bug just in case of.
Notes
- Images and microSD contents used on some examples could be downloaded from here: http://www.vizictechnologies.com/#!smartgpu-2/c1rc2 "SmartGPU2mbedExamples.zip"
- Get your SmartGPU2 from here: http://www.vizictechnologies.com/#!smartgpu-2/c1rc2
- Feel free to use the library and comment!
You need to log in to post a discussion
Questions